11 min read
Are you affected? Tailworm’s SSH findings only matter on a device that runs Tailscale SSH, and a device runs it only if someone turned it on, with tailscale set --ssh or with a switch in an app that wraps it. Windows, iPhone, Android, the Mac app and Synology and QNAP devices cannot run it. Tailscale’s documentation lists the server for Linux and, in the open-source command-line build, for macOS; the source code also builds it for FreeBSD and OpenBSD. Some NAS and router software has a switch for it: the admin console’s Machines page shows which devices report running it (step 2 of the check). Version 1.104.4 or later fixes the vulnerabilities Tailscale’s own post describes; some of the report’s eleven findings concern headscale or unreleased code. If a device runs the server, update that device.
Separately: if you have never edited your Tailscale access controls, the default policy lets you open a Tailscale SSH session as root (the administrator account) on any of your own devices that runs the server, after signing in again in a browser. Anyone who takes over one of your untagged devices (a tag is a label such as tag:server; most home devices have none) may be able to do the same; the default rule does not cover tagged devices. If no device runs the server, the rule has nothing to act on today; this is housekeeping, not an emergency. Deleting the ssh section closes it. The five-minute check below shows how, in a safe order.
The access policy Tailscale wrote when I created my tailnet (my Tailscale network) allowed a root SSH session on my own devices. I had never opened it. Claude, an AI model, pointed it out in its review of my first draft of this post, while we checked my network against Tailworm.
Tailworm is a report published over the weekend of 24 October 2026: eleven findings across Tailscale and headscale, the most serious in Tailscale’s built-in SSH server. In the researcher’s lab, an attacker who controlled one device became root on other machines that ran Tailscale SSH under a rule allowing that device in. Tailscale had not released a fix when the report appeared.
Below is a five-minute check for your own tailnet. What the attack needs, and what I found, follow it.
New to the command line? How to read the boxes
PS> means: type this in PowerShell on Windows (Start menu → type powershell → Enter). $ means: type this in a terminal on Linux or a Mac, or on a remote machine after you have logged in with ssh (a command that logs you in to another machine). Do not type the $ or PS> itself.
Each line that starts with $ or PS> is one command. Click that $ to copy just that line, paste it, press Enter, and wait for it to finish before the next. A box with a Copy button at the top holds one command (or one file), so copy it whole. A dashed box shows what you should see back; you do not type it.
A five-minute check for your own tailnet
Before you start
- You need: a computer (the steps are awkward on a phone), a browser and a sign-in to your tailnet with the Owner or Admin role (a Network admin cannot remove devices; an IT admin cannot edit the policy).
- How long, and how to undo: about five minutes for “Look”, which changes nothing. Every change to the policy starts with a saved copy of it, and every box says whether it only looks or changes something.
Look: nothing changes
- Open the admin console. Open a web browser, go to
console.tailscale.com/admin/machinesand sign in with the account that owns your tailnet. This only opens a page and takes about a minute. You should see a table of your devices. If you cannot open the page, your account may lack the Owner or Admin role; ask whoever has it. - Find devices that run Tailscale SSH. Above the table, click Filters, choose Property, then Tailscale SSH. The table shrinks to the devices that report running the server. An empty table means none does. If you cannot find Filters, see Tailscale’s page on filtering devices.
- Optional: confirm on one device. The collapsed block under this list shows how, on Linux or on a Mac with the command-line build.
- Read your policy. In the console’s top menu, click Access controls. If the visual editor opens, switch to the JSON editor. Click inside the text, press Ctrl+F (Cmd+F on a Mac), type
"ssh"and press Enter. No match means the policy has no SSH rule, and you can skip to “For everyone” below. A match that looks like the rule shown under “The policy I never wrote” below means your policy allows root sessions on your own devices; if it looks different, read its"users"line:rootin it allows root sessions. If step 2 showed devices, go to “If you do use Tailscale SSH” below; if its table was empty, go to “If you do not use Tailscale SSH”.
Optional: confirm on one device (Linux, or a Mac with the command-line build)
Open a terminal: on a Mac press Cmd+Space, type terminal and press Enter; on Linux open your terminal app, or log in to a remote machine with ssh <your-user>@<device-address> (ssh also works in PowerShell on Windows). Then run the command below. grep -i runssh keeps only the line that mentions RunSSH.
tailscale debug prefs | grep -i runsshIt answers at once.
"RunSSH": false,true means the device runs the server. If nothing is printed or the shell says tailscale: command not found, rely on step 2: the Mac app and Windows cannot run the server.
What Tailworm needs
I listed what the attack needs and checked each item against my own setup.
The devices on one Tailscale account form a tailnet, and a policy file in the admin console decides which device may reach which.
Tailscale SSH is an SSH server inside the Tailscale service, started on a device by tailscale set --ssh. The policy file, not a password or a key, decides who may log in and as which local account. According to the report, when such a session forwarded a Unix socket (a file-like channel that programs on one machine use to talk to each other), the Tailscale service did the work with root’s rights, and a gap between the check and the use of the socket got past the checks meant to limit it. A session allowed in as an ordinary user could act as root.
The SSH attack needs three things:
- A target device running Tailscale SSH.
- A rule in the policy file that lets the attacker’s device open an SSH session on that target, with forwarding allowed.
- An attacker who already controls a device the rule covers.
Tailworm does not provide the third; the attacker brings it: a vulnerable web application, a malicious package, phishing, stolen passwords. It is not an attack from the open internet.
What I found
| What the attack needs | What I found | Where to look on yours |
|---|---|---|
| Tailscale SSH running on the target | Not running on any of my devices when I checked | The admin console’s Machines page, filtered by property “Tailscale SSH” (step 2 of the check) |
| A policy rule allowing an SSH session | Yes: the default rule. Root or an ordinary account, on my own devices, after signing in again | The policy file (step 4 of the check) |
| A foothold on a device the rule covers | Possible, as on any network | — |
| The other findings | Apply to the features they involve: app connectors, tailscale serve, the relay connection every client makes and headscale (an open-source replacement for Tailscale’s hosted control server) |
The admin console |
So the first thing the attack needs was missing. The second, a rule allowing a session, was in place by default. Tailscale’s documentation does not say whether the default rule allows forwarding, which the socket attack needs.
Deep dive: other ways to check each item
- If you run OPNsense. The Tailscale plugin keeps its settings behind an API. The read-only call
GET /api/tailscale/settings/getreturns"enableSSH":"0"when the SSH server is off. Tailscale’s documentation lists the SSH server for Linux and macOS only, but its source code builds it for FreeBSD and OpenBSD too, and the OPNsense plugin has a switch for it. - Every device. In the admin console: Machines → Filters → Property → Tailscale SSH. If no device matches, none reports running the server.
- A Linux device, from the inside. The
--sshswitch sets a preference calledRunSSH.tailscale debug prefs | grep -i runsshshows"RunSSH": falsewhen the server is off.tailscale set --ssh=falseturns it off. - Versions. The report tested 1.104.2 and says nothing about earlier versions. Tailscale’s fix is in 1.104.4.
Deep dive: what the report found, and what Tailscale said
- What was tested. Tailscale 1.104.2 and headscale 0.29.5 (an open-source replacement for Tailscale’s hosted control server), unmodified, in a lab, from 22 to 24 October 2026.
- Findings 1 to 3, SSH socket forwarding. Local and remote forwarding of Unix sockets (
ssh -Landssh -R) were carried out by the root-run Tailscale service. A path check was made at one moment and the socket used at another, and a fast loop inside the session won the gap. In the lab this gave root through the Docker socket, replaced root-owned sockets with the attacker’s own, and captured a key used to enrol new devices, which then joined an attacker’s machine to the network. The report showed that last step end to end only with Tailnet Lock off. With Tailnet Lock on, it captured the material needed to disable the lock but did not use it. - Finding 5, SSH memory exhaustion. A logged-in session could make the root-run Tailscale service keep allocating memory.
- What Tailscale said. It said the issues “require urgent attention” and that the SSH vulnerabilities “primarily concerned how permissions were enforced” after a connection had been authorized; it disputes that the issues amount to a worm and calls this lateral movement limited to connections the policy already allows.
- Wormability. In the lab, one compromised device reached every device the policy allowed, in under a second per step. The report names one control that stopped the spread: rules written as one source to one destination. Keys held in hardware (a TPM or Secure Enclave) stopped a stolen device identity from lasting.
- Among the other findings. An app-connector design that does not check where traffic is going (Tailscale says this version, Conn25, has not been released);
tailscale serveforwarding to the service’s own control socket; memory exhaustion in the relay client (I found no bulletin for it); and denial of service against headscale. - The bulletins. Tailscale published four, dated 26 October, all fixed in 1.104.4: TS-2026-014 (SSH socket forwarding; Tailscale now forwards as the logged-in user, not as root), TS-2026-015 (SSH memory exhaustion), TS-2026-016 (
tailscale servereaching privileged sockets) and TS-2026-017 (Serve over HTTP/2 could pass one mount’sTailscale-App-Capabilitiesvalues to another mount on the same node). Until a device is updated, Tailscale’s mitigation for the forwarding flaw isTS_SSH_DISABLE_FORWARDING=1in the Tailscale service’s environment; the stopgap under “Then change what you found” shows how. - Earlier fixes in the same area. The bulletins of June and July already covered SSH socket forwarding that did not respect symlink permissions (TS-2026-004, 3 June) and a way round
autogroup:nonroot(TS-2026-009, 13 July), both fixed in 1.98.9. - Forwarding and the default rule. Tailscale’s SSH server forwards only when the matched rule carries a forwarding permission from Tailscale’s coordination server (
allowLocalPortForwardingandallowRemotePortForwardingin the source code). Tailscale’s public documentation does not say how a policy grants that or whether the default rule does. The report says to set per-rule forwarding fields to false on Tailscale’s hosted service but does not name them; I could not find them in Tailscale’s policy documentation. Bulletin TS-2026-014 says the issue affects users who “allow local or remote forwarding in their access policies”. - Disclosure. Tailscale says it received the report on the morning of Saturday 24 October and the report was published two hours later; it was already investigating related issues. The Hacker News reported that the researcher described it as “reported but not coordinated”.
The policy I never wrote
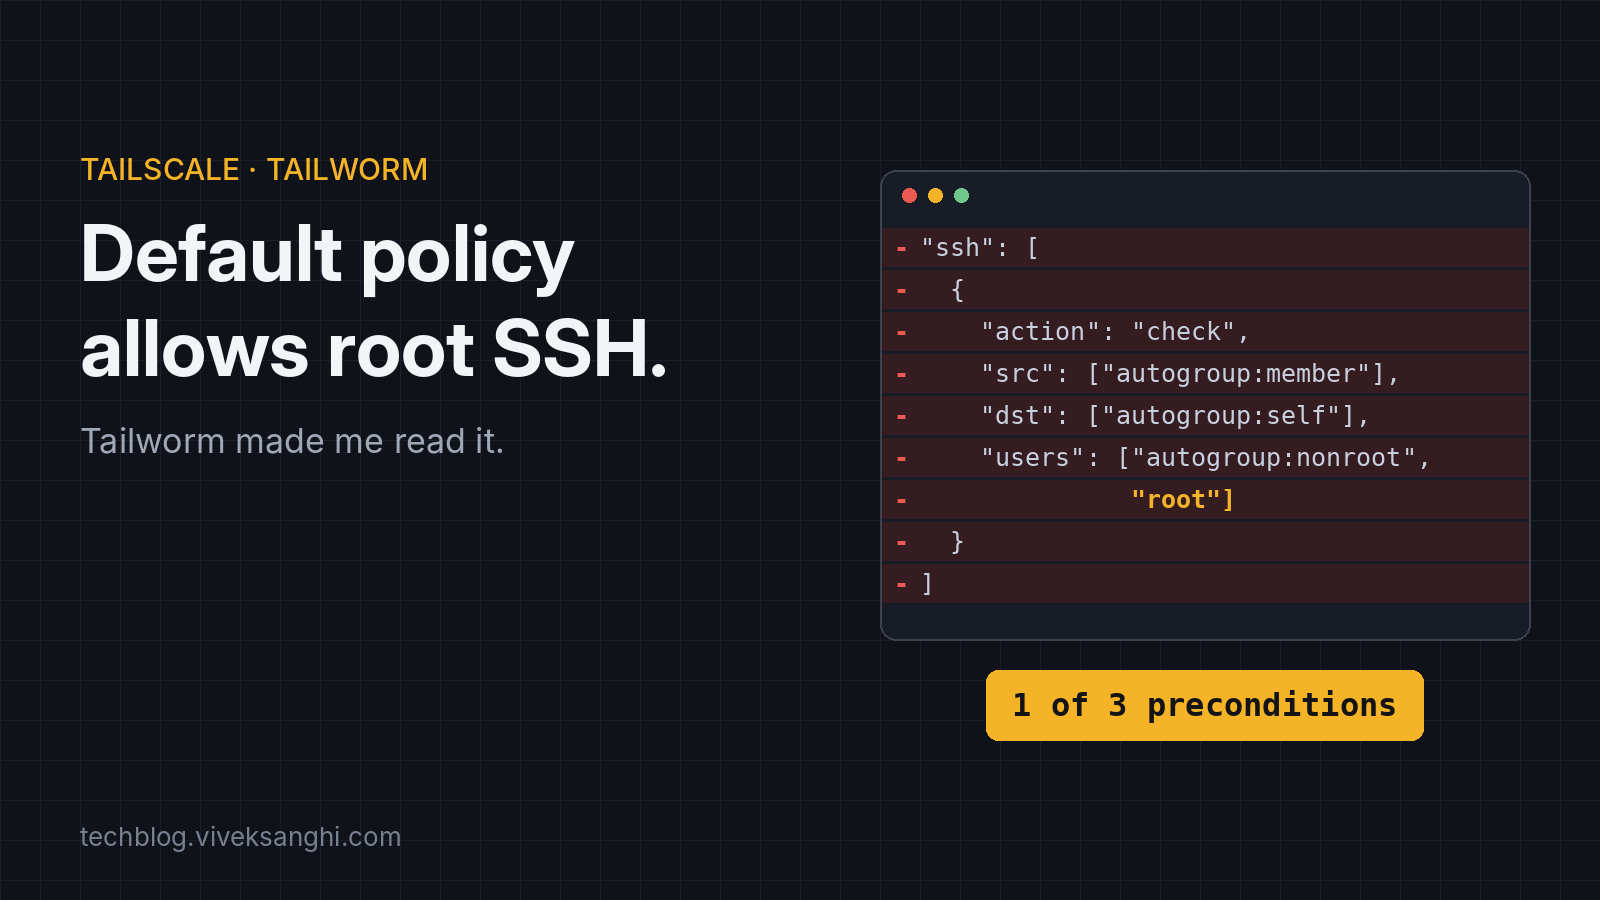
When you create a tailnet, Tailscale gives it a default policy. Its documentation describes it: every device may reach every other device on every port (I call this allow-all below), and every user may open a Tailscale SSH session on their own devices, in check mode, as root or as an ordinary user. The SSH part looks like this:
"ssh": [
  {
    "action": "check",
    "src":    ["autogroup:member"],
    "dst":    ["autogroup:self"],
    "users":  ["autogroup:nonroot", "root"]
  }
]
Any user of the tailnet (autogroup:member) may connect to the devices that user owns (autogroup:self; tagged devices are not included), as any local account except root (autogroup:nonroot), or as root. Mine had this rule, and allow-all with it. Tailscale’s policy-file page describes the default ssh rule with autogroup:nonroot and does not mention root; its SSH page and its example policies include root, as shown above.
The rule cannot tell me apart from someone who has taken over one of my devices. To Tailscale, a connection from one of my devices is me. If a Linux device on the tailnet ran tailscale set --ssh, someone who had taken over another of my devices could open a root session on it. That is the rule working as designed, not a flaw. Check mode asks for a browser sign-in of mine, and one approval can stay in force for 12 hours (see below).
Check mode asks for a fresh sign-in in the browser before the session starts. With the default check period, Tailscale’s documentation says one check-mode sign-in lets you reach that device and any other device in the tailnet for 12 hours without signing in again. It does not say whether that also covers a session opened from a different device. The report describes how an attacker on a device can wait for your next approval or prompt you for one, so check mode slows this down and does not stop it.
Tailworm needed socket forwarding to turn an ordinary account into root. The default rule needed none, only a check-mode approval. That is documented behaviour, not a vulnerability. Updating to 1.104.4 does not change it either: a session allowed in as root is root by design.
What I changed
The policy. The new one has no ssh section. Tailscale’s documentation says that removing the SSH rules disables Tailscale SSH across the tailnet. Grants can replace allow-all with only what is needed, for example:
- Exit nodes, if you use them: access to
autogroup:internet. - The few devices you must manage, and nothing more. Keep this grant narrow: any device it covers stays reachable.
Replacing allow-all has a cost: anything that relied on devices reaching each other stops, such as file sharing, a media server or a subnet route. Give each its own grant first.
Then tests. A policy file can carry tests: statements such as “this user may reach this port” that Tailscale checks every time the file changes. It refuses the change if one fails. Tests can say what must work and what must be refused, for example that SSH, file sharing and remote desktop (ports 22, 445 and 3389) are refused on a device that does not need them.
Deep dive: an example policy
This is a shape, not a template. It cuts off everything except exit nodes; pasted as it is, it would cut you off from your own NAS or media server. Addresses and the e-mail are placeholders.
{
  "grants": [
    // 1. Use exit nodes.
    {"src": ["autogroup:member"], "dst": ["autogroup:internet"], "ip": ["*"]},

    // 2. Add a grant for each device you must reach, and no more.

    // Nothing else: other devices accept no inbound tailnet traffic.
  ],

  // An empty "acls" list: Tailscale's documentation gives this form for deny-all;
  // omitting the section is documented as allow-all.
  "acls": [],

  // No "ssh" section: no Tailscale SSH session is allowed anywhere.

  "tests": [
    {
      "src":    "you@example.com",
      // "accept": ["100.x.y.2:445"],  one line like this for each thing that must work.
      "deny":   ["100.x.y.3:22", "100.x.y.3:445", "100.x.y.3:3389"], // a device that must refuse these
    },
  ],
}
A grant for a NAS that should serve file shares to the users of your tailnet, and nothing else, would look like this (the port is an example, and you add one tcp: entry for each other service it must serve; nas is a name you define in the policy’s hosts section, for example "hosts": {"nas": "100.x.y.2"}):
{"src": ["autogroup:member"], "dst": ["nas"], "ip": ["tcp:445"]},Notes:
- Only devices with access to
autogroup:internetcan use exit nodes, which is why grant 1 is written that way. - Tests check the rules, not the network: a passing test does not prove that a device answers.
- Why
"acls": []stays. Tailscale’s documentation says that omitting theaclssection is equivalent to the default allow-all policy, and its deny-all example is"acls": []. It does not say what omission means in a policy that has grants. Keep the empty list and let tests decide: a deny test for a port that allow-all would open fails while allow-all is in force. - Keep a copy of the old policy before saving (step 1 of “If you do not use Tailscale SSH: switch it off everywhere” below does this). Tailscale also lets you revert a change from the Configuration logs page.
Deep dive: the method I would use again
List what the attack needs; check each item on your own devices and note how; look for what is wrong even where the attack does not apply; and sort the rest into what to change, what to watch and what risk to accept.
Then change what you found
If you do not use Tailscale SSH: switch it off everywhere
Before you start: this changes your policy so that no device accepts a Tailscale SSH session. Do not do it if Tailscale SSH is your only way into some machine. It takes about three minutes. To undo it, paste the saved copy back (step 1) and save, or revert the change from the Configuration logs page.
- Save a copy of the policy. In the JSON editor click inside the text and press Ctrl+A (Cmd+A on a Mac), then Ctrl+C (Cmd+C). Open Notepad (Start menu → type
notepad→ Enter) or TextEdit on a Mac (Format → Make Plain Text first), paste with Ctrl+V (Cmd+V), and save the file aspolicy-backup.jsonin your Documents folder. The file should hold the whole policy, starting with{. - Delete the
sshsection. Back in the console, select everything from"ssh": [down to the]that lines up under it (not the]inside the rule), with the comma after it if there is one, and press Delete. The policy file allows a spare comma. Leave the other sections as they were. - Save. Click Save. Tailscale checks the policy, and any tests in it, before it applies the change. You should see the console confirm the save. If it reports a syntax error, a comma or bracket is out of place: paste the saved copy back and repeat from step 2. If it names an
sshTestsentry, delete that test as well. - Check. Reload the page, press Ctrl+F (Cmd+F) and search for
"ssh". There should be no match. A device that opted in keeps running the server until you runtailscale set --ssh=falseon it.
If you do use Tailscale SSH: update, then narrow the rule
Before you start: updating ends every open Tailscale SSH session on that device. Do not run the update from a Tailscale SSH session. Use another way in: a keyboard and screen on the machine, or an ordinary ssh login on your local network. An ssh login to the device’s Tailscale address (100.…) also drops when Tailscale restarts, and a drop mid-update can interrupt the install. The commands below are for Debian, Ubuntu and Raspberry Pi OS with Tailscale’s own package repository. For other systems, see Tailscale’s page on updating.
- Log in to the device by another way and open a terminal on it. You should see its shell prompt.
- See what version it runs.
tailscale versionThe first line is the version number. 1.104.4 or later has the fixes. Anything lower needs the update.
- Update.
sudoruns a command as administrator and may ask for your password; nothing shows as you type, so type it and press Enter.
sudo apt update
sudo apt install --only-upgrade tailscale
Each takes under a minute. Tailscale restarts for a few seconds. If an update is cut off part-way, sudo dpkg --configure -a finishes it. If apt says tailscale is already the newest version, the device either has the fix or did not get Tailscale from Tailscale’s repository.
- Check again with
tailscale version. The first line should read 1.104.4 or later. - Narrow the rule. If you log in as root on some host, such as a Proxmox server, or on a host where no other account has
sudo, this removes that access: check first. Save a copy of the policy (step 1 of “If you do not use Tailscale SSH: switch it off everywhere”) before you edit. Then in the console go to Access controls, JSON editor, find the"users"line of yoursshrule and delete, "root"from it:
"users": ["autogroup:nonroot", "root"]"users": ["autogroup:nonroot"]Click Save. The rule no longer hands out root sessions; use sudo after you log in. On a host where your account has passwordless sudo, this slows an intruder down and does not stop one. This does not replace the update: the July bulletin TS-2026-009 was a way round autogroup:nonroot. Also limit src and dst to the people and devices that need SSH.
Stopgap: switch off SSH forwarding on a device you cannot update yet
Use this only where the package source you use does not yet offer 1.104.4 or later. Tailscale’s mitigation for the forwarding flaw is the setting TS_SSH_DISABLE_FORWARDING=1 in the Tailscale service’s environment. On Debian-style installs the service reads /etc/default/tailscaled (the tailscaled.service file in Tailscale’s source names it as EnvironmentFile). I tested the commands below against copies of that file, not against a running Tailscale service. The restart ends open Tailscale SSH sessions, so run these from another way in. The commands assume systemd.
- Back up the file. If the command says
No such file or directory, this device keeps the setting elsewhere; stop and read Tailscale’s page for your install. Run it once: a second run replaces the backup with the edited file.
sudo cp /etc/default/tailscaled /etc/default/tailscaled.bak- Add the setting. The line starts with a blank line so it cannot join the last line of the file.
printf '\nTS_SSH_DISABLE_FORWARDING=1\n' | sudo tee -a /etc/default/tailscaledIt prints what it added. Run it once: a second run adds the line twice.
- Restart the service.
sudo systemctl restart tailscaled- Check that the running service has it.
sudo cat /proc/$(systemctl show -p MainPID --value tailscaled)/environ | tr '\0' '\n' | grep TS_SSHTS_SSH_DISABLE_FORWARDING=1No output means the service did not pick the setting up: check that the line is in the file with grep TS_SSH /etc/default/tailscaled, then repeat step 3. /proc/0/environ: No such file or directory means the service is not running.
- To undo it, remove the line and restart. Do this too once the device runs 1.104.4 or later; the setting is a stopgap. Removing the line is safe even if a package upgrade has replaced the file since step 1; the backup stays as a record. An upgrade may ask whether to keep your edited file:
sudo sed -i '/^TS_SSH_DISABLE_FORWARDING=1$/d' /etc/default/tailscaled
sudo systemctl restart tailscaled
If sed says it cannot read the file, there is nothing to undo on this device.
For everyone
- Remove devices you no longer look after, before they leave your hands. Do not remove a device you can reach only over Tailscale: you would need to be at the machine to add it back. In the console open Machines, find the device by name in the search bar, open the menu next to it, choose Remove and then Remove machine in the dialog. The device disappears from the list. If you remove one by mistake, sign the device in again to add it back; if your tailnet requires device approval, an admin must approve it.
- Look again at allow-all. Search Access controls for
"acls"and"grants". A rule whose source is*and whose destination is*or*:*is allow-all: every device may reach every other on every port. The steps to replace it follow.
Replace allow-all, step by step
Before you start: this changes your policy and can cut devices off from each other. Do it when you can test each service afterwards. It takes 15 to 30 minutes. To undo it, paste the saved copy of the policy back (step 1 of “If you do not use Tailscale SSH: switch it off everywhere”) and save, or revert the change from the Configuration logs page. If a phone or laptop of yours uses an exit node, test its internet access after each save: a wrong exit-node grant cuts it off.
- Write down what your devices need from each other: file shares, a media server, a subnet route, a printer. Use paper or a text file.
- Save a copy of the policy as described above.
- Add one grant for each need in the
"grants"section (add the section if there is none; allow-all is in"acls"), like the NAS example in “an example policy” earlier. Use the NAS’s Tailscale address (the Machines page shows it) in place ofnasif you have not defined that name. Add a grant for exit nodes if you use them. - Add tests for what must work, as in the same example. Click Save. If a test fails, Tailscale refuses the change and names the test.
- Delete the allow-all rule but keep the
"acls"section as"acls": []: Tailscale’s documentation gives that form for deny-all and says omitting the section is equivalent to allow-all. Add tests for what must not work (such as ports 22, 445 and 3389 on a device that should not accept them), and click Save again. Those tests fail while allow-all is still there, which is why they come now. - Test each service from a device that uses it. If one fails, add its grant, or paste the saved copy back.
Status
Version 1.104.4 was tagged late on 27 October 2026 (UTC); Tailscale’s changelog dates it 28 October. Version 1.104.5, released on 2 November 2026, fixes Tailscale SSH connection stalls and restart hangs, and stops check-mode sessions disconnecting when an approval expires; update to the current release. On 10 November 2026 the bulletins page (TS-2026-014 to TS-2026-017, dated 26 October) showed no CVE numbers.
How this was done
I did the checking with Claude, Anthropic’s AI model. It drafted the replacement policy and its tests, and this post. Claude’s review of my first draft pointed out that the default rule already allows root. Claude then checked that against Tailscale’s documentation; the open-source code does not contain the default policy.
Glossary
- Tailscale: a mesh VPN built on WireGuard, with a hosted service that handles sign-in and keys.
- Tailnet: the set of devices on one Tailscale account.
- Policy file: the tailnet’s access rules, edited in the admin console. Grants decide which devices may reach which; the
sshsection decides who may open Tailscale SSH sessions; tests check the rules every time they change. - Allow-all: the default
aclsrule that lets every device reach every other device on every port. - Tag: a label such as
tag:serverthat gives a device an identity of its own instead of a user’s; tagged devices are not covered byautogroup:self. - autogroup:member / self / nonroot: any user of the tailnet; the devices a user owns (not tagged ones); any local account except root.
- Tailscale SSH: an SSH server built into the Tailscale service, which decides who may log in from the policy file instead of passwords or keys.
- Check mode: an
sshrule action that asks the user to sign in again before a session starts; one sign-in lasts 12 hours by default. - Exit node: a device on the tailnet that other devices can send their internet traffic through.
- root: the administrator account on Linux and macOS, which can do anything on the machine.
- Subnet route: a device that lets the tailnet reach a whole local network behind it.
- Unix socket: a file-like endpoint that programs on the same machine use to talk to each other, such as Docker’s control socket.
- Port forwarding (in SSH): carrying another connection, such as one to a socket, through an SSH session.
- Tailnet Lock: a Tailscale feature that requires trusted devices to sign every new device before it can join.
- Foothold: a device an attacker already controls, from which further attacks start.
- headscale: an open-source replacement for Tailscale’s hosted control server.
- CVE: a public identifier for a specific vulnerability.
- sudo: a command prefix that runs the command as administrator; it may ask for your password.
- ssh: a command that logs you in to another machine.
Sources
- Tailworm report, Cyberdione Labs (24 October 2026, the date Tailscale gives; the report itself shows only “2026-10”): https://tailworm.com/
- Tailscale, “Tailscale SSH: Findings and fixes”, 28 October 2026: https://tailscale.com/blog/tailscale-ssh-findings-fixes
- Tailscale, “Tailscale SSH: Investigation”: https://tailscale.com/ssh-investigation-update
- Tailscale security bulletins, TS-2026-004, TS-2026-009 and TS-2026-014 to TS-2026-017 (read again 10 November 2026): https://tailscale.com/security-bulletins
- The Hacker News, “Unpatched Tailscale SSH Flaws Could Let a Hacked Device Reach Root on Other Servers”, 25 October 2026: https://thehackernews.com/2026/10/unpatched-tailscale-ssh-flaws-could-let.html
- Tailscale docs, Tailscale SSH (check mode, disabling): https://tailscale.com/docs/features/tailscale-ssh
- Tailscale docs, the default policy (“Allow all”): https://tailscale.com/docs/reference/examples/acls
- Tailscale docs, policy file syntax and tests: https://tailscale.com/docs/reference/syntax/policy-file
- Tailscale docs, grants syntax: https://tailscale.com/docs/reference/syntax/grants
- Tailscale docs, filtering devices in the admin console: https://tailscale.com/docs/features/access-control/device-management/how-to/filter
- Tailscale docs, removing a device: https://tailscale.com/docs/features/access-control/device-management/how-to/remove
- Tailscale docs, updating Tailscale: https://tailscale.com/docs/features/client/update
- Tailscale docs, the
tailscaledservice: https://tailscale.com/docs/reference/tailscaled - Tailscale source code (SSH server, netstack, peer API,
tailscaled.service) and the v1.104.4 tag: https://github.com/tailscale/tailscale
Tailscale की default policy root SSH की अनुमति देती है। Tailworm ने मुझसे उसे पढ़वाया।
पढ़ने का समय: 17 मिनट
Code, commands और technical terms अंग्रेज़ी में ही रखे गए हैं।
क्या आप प्रभावित हैं? Tailworm की SSH findings सिर्फ़ उस device पर मायने रखती हैं जिस पर Tailscale SSH चलता है, और कोई device इसे तभी चलाता है जब किसी ने इसे चालू किया हो, tailscale set --ssh से या इसे अपने अंदर चलाने वाले किसी app के switch से। Windows, iPhone, Android, Mac app और Synology व QNAP devices इसे नहीं चला सकते। Tailscale के documentation में यह server Linux के लिए और, open-source command-line build में, macOS के लिए दर्ज है; source code इसे FreeBSD और OpenBSD के लिए भी build करता है। कुछ NAS और router software में इसके लिए एक switch होता है: admin console का Machines page दिखाता है कि कौन-से devices इसे चलाने की report देते हैं (जाँच का चरण 2)। Version 1.104.4 या उसके बाद का version उन vulnerabilities को fix करता है जिन्हें Tailscale की अपनी post बताती है; report की ग्यारह findings में से कुछ headscale या unreleased code से जुड़ी हैं। अगर किसी device पर यह server चलता है, तो उस device को update करें।
इससे अलग: अगर आपने अपने Tailscale access controls कभी edit नहीं किए, तो default policy आपको अपने किसी भी ऐसे device पर, जिस पर यह server चलता है, browser में फिर से sign in करने के बाद root (administrator account) के रूप में Tailscale SSH session खोलने देती है। जो कोई आपके किसी untagged device पर कब्ज़ा कर ले (tag tag:server जैसा एक label है; ज़्यादातर घरेलू devices में कोई tag नहीं होता), वह भी शायद ऐसा कर सके; default rule tagged devices को कवर नहीं करता। अगर किसी device पर server नहीं चलता, तो आज इस rule के पास करने को कुछ नहीं है; यह रखरखाव का काम है, आपात स्थिति नहीं। ssh section हटाने से यह बंद हो जाता है। नीचे दी गई पाँच मिनट की जाँच सुरक्षित क्रम में यह करना बताती है।
जब मैंने अपना tailnet (मेरा Tailscale network) बनाया, तब Tailscale ने जो access policy लिखी, उसमें मेरे अपने devices पर root SSH session की अनुमति थी। मैंने उसे कभी खोला नहीं था। Claude, एक AI model, ने मेरे इस post के पहले draft की अपनी समीक्षा में इसकी ओर इशारा किया, जब हम मेरे network को Tailworm की findings से मिलाकर जाँच रहे थे।
Tailworm एक report है जो 24 अक्टूबर 2026 वाले weekend पर प्रकाशित हुई: Tailscale और headscale में ग्यारह findings, जिनमें सबसे गंभीर Tailscale के built-in SSH server में है। Researcher की lab में, जिस attacker के नियंत्रण में एक device था, वह उन दूसरी machines पर root बन गया जो Tailscale SSH चला रही थीं और जिन पर उस device को आने देने वाला rule मौजूद था। Report आने के समय Tailscale ने कोई fix release नहीं किया था।
नीचे आपके अपने tailnet के लिए पाँच मिनट की जाँच है। Attack को क्या चाहिए, और मुझे क्या मिला, यह उसके बाद आता है।
Command line में नए हैं? Boxes कैसे पढ़ें
PS> का मतलब: इसे Windows में PowerShell में type करें (Start menu → powershell type करें → Enter)। $ का मतलब: इसे Linux या Mac के terminal में type करें, या किसी remote machine पर, जब आप ssh (दूसरी machine में login करने वाली command) से login कर चुके हों। $ या PS> को खुद type न करें।
हर वह line जो $ या PS> से शुरू होती है, एक command है। सिर्फ़ वह line copy करने के लिए उस $ पर click करें, उसे paste करें, Enter दबाएँ, और अगली command से पहले उसके पूरा होने का इंतज़ार करें। ऊपर Copy button वाला box एक command (या एक file) रखता है, इसलिए उसे पूरा copy करें। Dashed box दिखाता है कि जवाब में आपको क्या दिखना चाहिए; उसे आप type नहीं करते।
अपने tailnet के लिए पाँच मिनट की जाँच
शुरू करने से पहले
- आपको चाहिए: एक computer (phone पर ये चरण असुविधाजनक हैं), एक browser और आपके tailnet में Owner या Admin role वाला sign-in (Network admin devices नहीं हटा सकता; IT admin policy edit नहीं कर सकता)।
- कितना समय लगेगा, और undo कैसे करें: “देखें” में लगभग पाँच मिनट, जो कुछ नहीं बदलता। Policy में हर बदलाव उसकी सहेजी हुई copy से शुरू होता है, और हर box बताता है कि वह सिर्फ़ देखता है या कुछ बदलता है।
देखें: कुछ नहीं बदलता
- Admin console खोलें। Web browser खोलें,
console.tailscale.com/admin/machinesपर जाएँ और उस account से sign in करें जो आपके tailnet का मालिक है। इसमें सिर्फ़ एक page खुलता है और लगभग एक मिनट लगता है। आपको अपने devices की table दिखनी चाहिए। अगर page नहीं खुलता, तो हो सकता है आपके account के पास Owner या Admin role न हो; जिसके पास हो उससे पूछें। - Tailscale SSH चलाने वाले devices खोजें। Table के ऊपर Filters पर click करें, Property चुनें, फिर Tailscale SSH। Table उन devices तक सिमट जाती है जो server चलाने की report देते हैं। खाली table का मतलब है कि कोई नहीं देता। अगर Filters नहीं मिलता, तो Tailscale का devices को filter करने वाला page देखें।
- वैकल्पिक: एक device पर पुष्टि करें। इस list के नीचे का collapsed block बताता है कि Linux पर, या command-line build वाले Mac पर, कैसे।
- अपनी policy पढ़ें। Console के top menu में Access controls पर click करें। अगर visual editor खुले, तो JSON editor पर switch करें। Text के अंदर click करें, Ctrl+F (Mac पर Cmd+F) दबाएँ,
"ssh"type करें और Enter दबाएँ। कोई match नहीं मिला तो policy में कोई SSH rule नहीं है, और आप नीचे “सबके लिए” पर जा सकते हैं। नीचे “वह policy जो मैंने कभी लिखी नहीं” में दिखाए rule जैसा match मिला तो आपकी policy आपके अपने devices पर root sessions की अनुमति देती है; अगर वह अलग दिखे, तो उसकी"users"line पढ़ें: उसमेंrootहो तो root sessions की अनुमति है। अगर चरण 2 में devices दिखे थे, तो नीचे “अगर आप Tailscale SSH इस्तेमाल करते हैं” पर जाएँ; अगर उसकी table खाली थी, तो “अगर आप Tailscale SSH इस्तेमाल नहीं करते” पर जाएँ।
वैकल्पिक: एक device पर पुष्टि करें (Linux, या command-line build वाला Mac)
Terminal खोलें: Mac पर Cmd+Space दबाएँ, terminal type करें और Enter दबाएँ; Linux पर अपना terminal app खोलें, या ssh <your-user>@<device-address> से किसी remote machine में login करें (ssh Windows के PowerShell में भी चलता है)। फिर नीचे की command चलाएँ। grep -i runssh सिर्फ़ वही line रखता है जिसमें RunSSH है।
tailscale debug prefs | grep -i runsshयह तुरंत जवाब देता है।
"RunSSH": false,true का मतलब है कि device server चलाता है। अगर कुछ print नहीं होता या shell कहता है tailscale: command not found, तो चरण 2 पर भरोसा करें: Mac app और Windows server नहीं चला सकते।
Tailworm को क्या चाहिए
मैंने सूची बनाई कि attack को क्या चाहिए, और हर चीज़ को अपने setup से मिलाकर देखा।
एक Tailscale account के devices मिलकर एक tailnet बनाते हैं, और admin console में एक policy file तय करती है कि कौन-सा device किस device तक पहुँच सकता है।
Tailscale SSH, Tailscale service के अंदर का एक SSH server है, जो किसी device पर tailscale set --ssh से शुरू होता है। कौन login कर सकता है और किस local account के रूप में, यह कोई password या key नहीं, policy file तय करती है। Report के अनुसार, जब ऐसा कोई session किसी Unix socket (file जैसा एक channel, जिसे एक ही machine के programs आपस में बात करने के लिए इस्तेमाल करते हैं) को forward करता था, तो Tailscale service यह काम root के अधिकारों से करती थी, और socket की जाँच और उसके इस्तेमाल के बीच का एक अंतराल उन checks से निकल गया जो इसे सीमित करने के लिए थे। जिस session को साधारण user के रूप में आने दिया गया था, वह root की तरह काम कर सकता था।
SSH attack को तीन चीज़ें चाहिए:
- एक target device जिस पर Tailscale SSH चल रहा हो।
- Policy file में एक rule जो attacker के device को उस target पर SSH session खोलने दे, forwarding की अनुमति के साथ।
- एक attacker जिसके नियंत्रण में पहले से कोई ऐसा device हो जो उस rule के दायरे में आता है।
तीसरी चीज़ Tailworm नहीं देता; attacker उसे खुद लाता है: कोई vulnerable web application, कोई malicious package, phishing, चोरी हुए passwords। यह खुले internet से होने वाला attack नहीं है।
मुझे क्या मिला
| Attack को क्या चाहिए | मुझे क्या मिला | आपके यहाँ कहाँ देखें |
|---|---|---|
| Target पर Tailscale SSH चलना | जब मैंने जाँच की, मेरे किसी device पर नहीं चल रहा था | Admin console का Machines page, property “Tailscale SSH” से filter किया हुआ (जाँच का चरण 2) |
| SSH session की अनुमति देने वाला policy rule | हाँ: default rule। मेरे अपने devices पर root या साधारण account, फिर से sign in करने के बाद | Policy file (जाँच का चरण 4) |
| Rule के दायरे में आने वाले device पर foothold | संभव है, जैसा किसी भी network में | — |
| बाकी findings | उन features पर लागू होती हैं जिनसे वे जुड़ी हैं: app connectors, tailscale serve, वह relay connection जो हर client बनाता है, और headscale (Tailscale के hosted control server का open-source विकल्प) |
Admin console |
तो attack को जिस पहली चीज़ की ज़रूरत है, वह मौजूद नहीं थी। दूसरी, session की अनुमति देने वाला rule, default रूप से मौजूद था। Tailscale का documentation नहीं बताता कि default rule forwarding की अनुमति देता है या नहीं, जो socket attack को चाहिए।
विस्तार से: हर चीज़ को जाँचने के दूसरे तरीके
- अगर आप OPNsense चलाते हैं। Tailscale plugin अपनी settings एक API के पीछे रखता है। Read-only call
GET /api/tailscale/settings/getSSH server बंद होने पर"enableSSH":"0"लौटाता है। Tailscale का documentation SSH server सिर्फ़ Linux और macOS के लिए बताता है, पर उसका source code इसे FreeBSD और OpenBSD के लिए भी build करता है, और OPNsense plugin में इसका एक switch है। - हर device। Admin console में: Machines → Filters → Property → Tailscale SSH। अगर कोई device match नहीं करता, तो किसी device ने server चलाने की report नहीं दी।
- Linux device, अंदर से।
--sshswitchRunSSHनाम की एक preference सेट करता है।tailscale debug prefs | grep -i runsshserver बंद होने पर"RunSSH": falseदिखाता है।tailscale set --ssh=falseइसे बंद करता है। - Versions। Report ने 1.104.2 को test किया और उससे पहले के versions के बारे में कुछ नहीं कहती। Tailscale का fix 1.104.4 में है।
विस्तार से: report में क्या मिला, और Tailscale ने क्या कहा
- क्या test हुआ। Tailscale 1.104.2 और headscale 0.29.5 (Tailscale के hosted control server का open-source विकल्प), बिना किसी बदलाव के, एक lab में, 22 से 24 अक्टूबर 2026 तक।
- Findings 1 से 3, SSH socket forwarding। Unix sockets की local और remote forwarding (
ssh -Lऔरssh -R) root के रूप में चलने वाली Tailscale service करती थी। Path की जाँच एक क्षण पर हुई और socket दूसरे क्षण पर इस्तेमाल हुआ, और session के अंदर एक तेज़ loop उस अंतराल में race जीत गया। Lab में इससे Docker socket के ज़रिए root मिला, root के स्वामित्व वाले sockets की जगह attacker के अपने sockets रख दिए गए, और नए devices को enrol करने वाली एक key पकड़ ली गई, जिससे attacker की एक machine network में जुड़ गई। Report ने यह आख़िरी चरण पूरा सिर्फ़ तब दिखाया जब Tailnet Lock बंद था। Tailnet Lock चालू होने पर, उसने lock बंद करने के लिए ज़रूरी सामग्री पकड़ी, पर उसका इस्तेमाल नहीं किया। - Finding 5, SSH memory exhaustion। Login किया हुआ session root के रूप में चलने वाली Tailscale service से लगातार memory allocate करवा सकता था।
- Tailscale ने क्या कहा। उसने कहा कि इन issues पर “require urgent attention” (यानी तुरंत ध्यान चाहिए), और SSH vulnerabilities “primarily concerned how permissions were enforced” (मुख्यतः यह कि connection के authorize होने के बाद permissions कैसे लागू हुईं); वह इससे असहमत है कि ये issues किसी worm के बराबर हैं, और इसे lateral movement कहता है जो उन connections तक सीमित है जिन्हें policy पहले से अनुमति देती है।
- Wormability। Lab में एक compromised device उन सभी devices तक पहुँचा जिन्हें policy ने अनुमति दी थी, हर चरण में एक सेकंड से कम समय में। Report एक control का नाम बताती है जिसने फैलाव रोका: एक source से एक destination तक लिखे गए rules। Hardware में रखी keys (TPM या Secure Enclave) ने चोरी हुई device identity को टिकने से रोका।
- बाकी findings में। एक app-connector design जो यह नहीं जाँचता कि traffic कहाँ जा रहा है (Tailscale के अनुसार यह version, Conn25, release नहीं हुआ है);
tailscale serveका service के अपने control socket तक forward करना; relay client में memory exhaustion (मुझे इसके लिए कोई bulletin नहीं मिला); और headscale पर denial of service। - Bulletins। Tailscale ने चार प्रकाशित किए, 26 अक्टूबर की तारीख़ के, सब 1.104.4 में fix हुए: TS-2026-014 (SSH socket forwarding; Tailscale अब login किए हुए user के रूप में forward करता है, root के रूप में नहीं), TS-2026-015 (SSH memory exhaustion), TS-2026-016 (
tailscale serveका privileged sockets तक पहुँचना) और TS-2026-017 (HTTP/2 पर Serve एक mount केTailscale-App-Capabilitiesvalues को उसी node के किसी दूसरे mount तक पहुँचा सकता था)। जब तक device update नहीं होता, forwarding की खामी के लिए Tailscale का mitigation Tailscale service के environment मेंTS_SSH_DISABLE_FORWARDING=1है; “फिर जो मिला, उसे बदलें” में दिया गया stopgap बताता है कि कैसे। - उसी क्षेत्र के पहले के fixes। जून और जुलाई के bulletins में पहले ही उस SSH socket forwarding खामी का समाधान था जो symlink permissions का सम्मान नहीं करती थी (TS-2026-004, 3 जून) और
autogroup:nonrootको पार करने के एक रास्ते का (TS-2026-009, 13 जुलाई); दोनों 1.98.9 में fix हुए। - Forwarding और default rule। Tailscale का SSH server तभी forward करता है जब मेल खाने वाले rule के साथ Tailscale के coordination server की ओर से forwarding की permission हो (source code में
allowLocalPortForwardingऔरallowRemotePortForwarding)। Tailscale का public documentation नहीं बताता कि policy यह permission कैसे देती है या default rule देता है या नहीं। Report कहती है कि Tailscale की hosted service पर प्रति-rule forwarding fields को false करें, पर उनके नाम नहीं बताती; मुझे वे Tailscale के policy documentation में नहीं मिले। Bulletin TS-2026-014 कहता है कि यह issue उन users पर लागू होता है जो “allow local or remote forwarding in their access policies” (यानी अपनी access policies में local या remote forwarding की अनुमति देते हैं)। - Disclosure। Tailscale के अनुसार उसे report शनिवार 24 अक्टूबर की सुबह मिली और report दो घंटे बाद प्रकाशित हो गई; वह पहले से ही संबंधित issues की जाँच कर रहा था। The Hacker News ने बताया कि researcher ने इसे “reported but not coordinated” बताया।
वह policy जो मैंने कभी लिखी नहीं
जब आप tailnet बनाते हैं, Tailscale उसे एक default policy देता है। उसका documentation इसे बताता है: हर device बाकी हर device तक हर port पर पहुँच सकता है (नीचे मैं इसे allow-all कहता हूँ), और हर user अपने devices पर check mode में, root या साधारण user के रूप में, Tailscale SSH session खोल सकता है। SSH वाला हिस्सा ऐसा दिखता है:
"ssh": [
  {
    "action": "check",
    "src":    ["autogroup:member"],
    "dst":    ["autogroup:self"],
    "users":  ["autogroup:nonroot", "root"]
  }
]
Tailnet का कोई भी user (autogroup:member) उन devices से connect कर सकता है जो उस user के हैं (autogroup:self; tagged devices शामिल नहीं हैं), root को छोड़कर किसी भी local account के रूप में (autogroup:nonroot), या root के रूप में। मेरे पास यही rule था, और उसके साथ allow-all भी। Tailscale का policy-file page default ssh rule को autogroup:nonroot के साथ बताता है और root का ज़िक्र नहीं करता; उसका SSH page और उसकी example policies में root शामिल है, जैसा ऊपर दिखाया गया है।
यह rule मुझमें और उस व्यक्ति में फ़र्क नहीं कर सकता जिसने मेरे किसी device पर कब्ज़ा कर लिया हो। Tailscale के लिए मेरे device से आया connection मैं ही हूँ। अगर tailnet का कोई Linux device tailscale set --ssh चला लेता, तो मेरे किसी दूसरे device पर कब्ज़ा करने वाला उस पर root session खोल सकता था। यह rule का design के अनुसार काम करना है, कोई खामी नहीं। Check mode मेरा browser sign-in माँगता है, और एक मंज़ूरी 12 घंटे तक लागू रह सकती है (नीचे देखें)।
Check mode session शुरू होने से पहले browser में नया sign-in माँगता है। Default check period के साथ, Tailscale का documentation कहता है कि check mode का एक sign-in आपको उस device तक और tailnet के बाकी किसी भी device तक 12 घंटे के लिए बिना फिर sign in किए पहुँचने देता है। वह यह नहीं बताता कि यह किसी दूसरे device से खोले गए session को भी कवर करता है या नहीं। Report बताती है कि किसी device पर बैठा attacker आपकी अगली मंज़ूरी का इंतज़ार कर सकता है या आपसे उसे माँग सकता है, इसलिए check mode इसे धीमा करता है, रोकता नहीं।
Tailworm को साधारण account को root बनाने के लिए socket forwarding चाहिए थी। Default rule को कुछ नहीं चाहिए था, सिर्फ़ check-mode की मंज़ूरी। यह documentation में बताया गया व्यवहार है, कोई vulnerability नहीं। 1.104.4 पर update करने से भी यह नहीं बदलता: जिस session को root के रूप में आने दिया गया, वह design से root है।
मैंने क्या बदला
Policy। नई policy में ssh section नहीं है। Tailscale का documentation कहता है कि SSH rules हटाने से पूरे tailnet में Tailscale SSH बंद हो जाता है। Grants से allow-all की जगह सिर्फ़ वही दिया जा सकता है जिसकी ज़रूरत है, जैसे:
- Exit nodes, अगर आप उन्हें इस्तेमाल करते हैं:
autogroup:internetतक access। - वे थोड़े devices जिन्हें आपको manage करना ही है, और कुछ नहीं। इस grant को संकरा रखें: जो भी device इसके दायरे में है, वह पहुँच में रहता है।
Allow-all को बदलने की एक कीमत है: जो कुछ devices के एक-दूसरे तक पहुँचने पर टिका था, वह रुक जाता है, जैसे file sharing, media server या subnet route। पहले हर एक को उसका अपना grant दें।
फिर tests। Policy file में tests हो सकते हैं: ऐसे कथन जैसे “यह user इस port तक पहुँच सकता है”, जिन्हें Tailscale file बदलने पर हर बार जाँचता है। कोई test fail हो तो वह बदलाव को मना कर देता है। Tests कह सकते हैं कि क्या चलना चाहिए और क्या मना होना चाहिए, जैसे कि जिस device को SSH, file sharing और remote desktop (ports 22, 445 और 3389) की ज़रूरत नहीं, उस पर ये मना हों।
विस्तार से: एक example policy
यह एक ढाँचा है, template नहीं। यह exit nodes को छोड़कर बाकी सब कुछ काट देता है; जैसा है वैसा paste करने पर यह आपको आपके अपने NAS या media server से काट देगा। Addresses और e-mail placeholders हैं।
{
  "grants": [
    // 1. Use exit nodes.
    {"src": ["autogroup:member"], "dst": ["autogroup:internet"], "ip": ["*"]},

    // 2. Add a grant for each device you must reach, and no more.

    // Nothing else: other devices accept no inbound tailnet traffic.
  ],

  // An empty "acls" list: Tailscale's documentation gives this form for deny-all;
  // omitting the section is documented as allow-all.
  "acls": [],

  // No "ssh" section: no Tailscale SSH session is allowed anywhere.

  "tests": [
    {
      "src":    "you@example.com",
      // "accept": ["100.x.y.2:445"],  one line like this for each thing that must work.
      "deny":   ["100.x.y.3:22", "100.x.y.3:445", "100.x.y.3:3389"], // a device that must refuse these
    },
  ],
}
NAS के लिए एक grant, जो आपके tailnet के users को file shares दे और कुछ नहीं, ऐसा दिखेगा (port एक example है, और जितनी दूसरी services उसे देनी हों, उनमें से हर एक के लिए एक tcp: entry जोड़ें; nas वह नाम है जो आप policy के hosts section में परिभाषित करते हैं, जैसे "hosts": {"nas": "100.x.y.2"}):
{"src": ["autogroup:member"], "dst": ["nas"], "ip": ["tcp:445"]},टिप्पणियाँ:
- सिर्फ़ वे devices exit nodes इस्तेमाल कर सकते हैं जिनके पास
autogroup:internetकी access है, इसीलिए grant 1 ऐसे लिखा गया है। - Tests rules को जाँचते हैं, network को नहीं: test का पास होना यह साबित नहीं करता कि कोई device जवाब देता है।
"acls": []क्यों रहता है। Tailscale का documentation कहता है किaclssection छोड़ देना default allow-all policy के बराबर है, और उसका deny-all example"acls": []है। यह नहीं बताता कि जिस policy में grants हैं, उसमें section छोड़ने का क्या मतलब है। खाली list रखें और tests को तय करने दें: जिस port को allow-all खोल देता, उसके लिए deny test तब तक fail होता है जब तक allow-all लागू है।- Save करने से पहले पुरानी policy की एक copy रखें (नीचे “अगर आप Tailscale SSH इस्तेमाल नहीं करते: उसे हर जगह बंद कर दें” का चरण 1 यह करता है)। Tailscale आपको Configuration logs page से कोई बदलाव revert करने भी देता है।
विस्तार से: वह तरीका जो मैं फिर अपनाऊँगा
सूची बनाएँ कि attack को क्या चाहिए; हर चीज़ को अपने devices पर जाँचें और लिखें कैसे; वह भी देखें जो attack लागू न होने पर भी गलत है; और बाकी को छाँटें: क्या बदलना है, किस पर नज़र रखनी है और कौन-सा जोखिम स्वीकार करना है।
फिर जो मिला, उसे बदलें
अगर आप Tailscale SSH इस्तेमाल नहीं करते: उसे हर जगह बंद कर दें
शुरू करने से पहले: यह आपकी policy इस तरह बदलता है कि कोई device Tailscale SSH session स्वीकार नहीं करता। अगर Tailscale SSH किसी machine में जाने का आपका अकेला रास्ता है, तो यह न करें। इसमें लगभग तीन मिनट लगते हैं। Undo करने के लिए सहेजी हुई copy वापस paste करें (चरण 1) और save करें, या Configuration logs page से बदलाव को revert करें।
- Policy की copy सहेजें। JSON editor में text के अंदर click करें और Ctrl+A (Mac पर Cmd+A), फिर Ctrl+C (Cmd+C) दबाएँ। Notepad खोलें (Start menu →
notepadtype करें → Enter) या Mac पर TextEdit (पहले Format → Make Plain Text), Ctrl+V (Cmd+V) से paste करें, और file को अपने Documents folder मेंpolicy-backup.jsonनाम से सहेजें। File में पूरी policy होनी चाहिए, जो{से शुरू होती है। sshsection हटाएँ। Console में लौटकर"ssh": [से लेकर उस]तक सब कुछ चुनें जो उसके ठीक नीचे सीध में है (rule के अंदर वाला]नहीं), और अगर उसके बाद comma हो तो उसे भी, फिर Delete दबाएँ। Policy file में फ़ालतू comma चल जाता है। बाकी sections को जैसा था वैसा रहने दें।- Save करें। Save पर click करें। बदलाव लागू करने से पहले Tailscale policy को और उसके किसी भी tests को जाँचता है। आपको console में save की पुष्टि दिखनी चाहिए। अगर वह syntax error बताए, तो कोई comma या bracket गलत जगह है: सहेजी हुई copy वापस paste करें और चरण 2 से दोहराएँ। अगर वह किसी
sshTestsentry का नाम ले, तो उस test को भी हटा दें। - जाँचें। Page reload करें, Ctrl+F (Cmd+F) दबाएँ और
"ssh"खोजें। कोई match नहीं होना चाहिए। जिस device ने opt in किया था, वह तब तक server चलाता रहता है जब तक आप उस परtailscale set --ssh=falseनहीं चलाते।
अगर आप Tailscale SSH इस्तेमाल करते हैं: update करें, फिर rule को सीमित करें
शुरू करने से पहले: update करने से उस device पर हर खुला Tailscale SSH session खत्म हो जाता है। Update को Tailscale SSH session से न चलाएँ। कोई दूसरा रास्ता इस्तेमाल करें: machine पर keyboard और screen, या अपने local network पर साधारण ssh login। Device के Tailscale address (100.…) पर ssh login भी तब टूट जाता है जब Tailscale restart होता है, और update के बीच में टूटना install में बाधा डाल सकता है। नीचे की commands Debian, Ubuntu और Raspberry Pi OS के लिए हैं, जिनमें Tailscale की अपनी package repository हो। दूसरे systems के लिए Tailscale का update करने वाला page देखें।
- किसी दूसरे रास्ते से device में login करें और उस पर terminal खोलें। आपको उसका shell prompt दिखना चाहिए।
- देखें कि वह कौन-सा version चला रहा है।
tailscale versionपहली line version number है। 1.104.4 या उससे ऊपर में fixes हैं। उससे नीचे वाले को update चाहिए।
- Update करें।
sudoएक command को administrator के रूप में चलाता है और आपका password माँग सकता है; type करते समय कुछ दिखता नहीं, इसलिए उसे type करें और Enter दबाएँ।
sudo apt update
sudo apt install --only-upgrade tailscale
हर एक में एक मिनट से कम लगता है। Tailscale कुछ सेकंड के लिए restart होता है। अगर update बीच में कट जाए, तो sudo dpkg --configure -a उसे पूरा करता है। अगर apt कहता है कि tailscale पहले से सबसे नया version है, तो device में या तो fix है या device पर Tailscale, Tailscale की अपनी repository से install नहीं हुआ था।
- फिर जाँचें,
tailscale versionसे। पहली line में 1.104.4 या उससे ऊपर का version होना चाहिए। - Rule को सीमित करें। अगर आप किसी host पर root के रूप में login करते हैं, जैसे Proxmox server पर, या ऐसे host पर जहाँ किसी दूसरे account के पास
sudoनहीं है, तो यह वह access हटा देता है: पहले जाँच लें। Edit करने से पहले policy की copy सहेजें (“अगर आप Tailscale SSH इस्तेमाल नहीं करते: उसे हर जगह बंद कर दें” का चरण 1)। फिर console में Access controls, JSON editor पर जाएँ, अपनेsshrule की"users"line खोजें और उसमें से, "root"हटा दें:
"users": ["autogroup:nonroot", "root"]"users": ["autogroup:nonroot"]Save पर click करें। Rule अब root sessions नहीं देता; login के बाद sudo इस्तेमाल करें। जिस host पर आपके account के पास बिना password का sudo है, वहाँ यह intruder को धीमा करता है, रोकता नहीं। यह update की जगह नहीं लेता: जुलाई का bulletin TS-2026-009 autogroup:nonroot को पार करने का एक रास्ता था। src और dst को भी सिर्फ़ उन लोगों और devices तक सीमित करें जिन्हें SSH चाहिए।
Stopgap: जिस device को आप अभी update नहीं कर सकते, उस पर SSH forwarding बंद करें
इसे सिर्फ़ वहाँ इस्तेमाल करें जहाँ आपका package source अभी 1.104.4 या उसके बाद का version नहीं देता। Forwarding की खामी के लिए Tailscale का mitigation Tailscale service के environment में TS_SSH_DISABLE_FORWARDING=1 setting है। Debian जैसे installs पर service /etc/default/tailscaled पढ़ती है (Tailscale के source में tailscaled.service file इसे EnvironmentFile के रूप में नाम देती है)। मैंने नीचे की commands उस file की copies पर test कीं, चलती Tailscale service पर नहीं। Restart से खुले Tailscale SSH sessions खत्म हो जाते हैं, इसलिए इन्हें किसी दूसरे रास्ते से चलाएँ। ये commands मानकर चलती हैं कि system systemd चलाता है।
- File का backup लें। अगर command
No such file or directoryकहती है, तो इस device पर setting कहीं और रखी जाती है; रुकें और अपने install के लिए Tailscale का page पढ़ें। इसे एक बार चलाएँ: दूसरी बार चलाने पर backup की जगह edit की हुई file आ जाती है।
sudo cp /etc/default/tailscaled /etc/default/tailscaled.bak- Setting जोड़ें। Line एक खाली line से शुरू होती है ताकि वह file की आख़िरी line से जुड़ न जाए।
printf '\nTS_SSH_DISABLE_FORWARDING=1\n' | sudo tee -a /etc/default/tailscaledयह छापता है कि उसने क्या जोड़ा। इसे एक बार चलाएँ: दूसरी बार चलाने पर line दो बार जुड़ जाती है।
- Service को restart करें।
sudo systemctl restart tailscaled- जाँचें कि चलती service में यह setting है।
sudo cat /proc/$(systemctl show -p MainPID --value tailscaled)/environ | tr '\0' '\n' | grep TS_SSHTS_SSH_DISABLE_FORWARDING=1कोई output नहीं मिला तो service ने setting लागू नहीं की: grep TS_SSH /etc/default/tailscaled से जाँचें कि line file में है, फिर चरण 3 दोहराएँ। /proc/0/environ: No such file or directory का मतलब है कि service चल नहीं रही।
- Undo करने के लिए, line हटाएँ और restart करें। Device के 1.104.4 या उसके बाद के version पर आने के बाद भी ऐसा करें; यह setting एक stopgap है। Line हटाना तब भी सुरक्षित है जब चरण 1 के बाद किसी package upgrade ने file बदल दी हो; backup एक record के रूप में बना रहता है। Upgrade पूछ सकता है कि आपकी edit की हुई file रखनी है या नहीं:
sudo sed -i '/^TS_SSH_DISABLE_FORWARDING=1$/d' /etc/default/tailscaled
sudo systemctl restart tailscaled
अगर sed कहता है कि वह file पढ़ नहीं सकता, तो इस device पर undo करने को कुछ नहीं है।
सबके लिए
- जिन devices की आप अब देखभाल नहीं करते उन्हें हटाएँ, उनके आपके हाथ से निकलने से पहले। जिस device तक आप सिर्फ़ Tailscale से पहुँच सकते हैं, उसे न हटाएँ: उसे वापस जोड़ने के लिए आपको machine के पास होना पड़ेगा। Console में Machines खोलें, search bar में device को नाम से खोजें, उसके बगल का menu खोलें, Remove चुनें और फिर dialog में Remove machine। Device list से गायब हो जाता है। अगर आपने गलती से कोई device हटा दिया, तो उस device को फिर से sign in करें ताकि वह वापस जुड़ जाए; अगर आपके tailnet में device approval ज़रूरी है, तो admin को उसे मंज़ूर करना होगा।
- Allow-all को फिर से देखें। Access controls में
"acls"और"grants"खोजें। जिस rule का source*है और destination*या*:*, वह allow-all है: हर device बाकी हर device तक हर port पर पहुँच सकता है। इसे बदलने के चरण आगे हैं।
Allow-all को बदलें, चरण दर चरण
शुरू करने से पहले: यह आपकी policy बदलता है और devices को एक-दूसरे से काट सकता है। इसे तब करें जब आप बाद में हर service को test कर सकें। इसमें 15 से 30 मिनट लगते हैं। Undo करने के लिए policy की सहेजी हुई copy वापस paste करें (“अगर आप Tailscale SSH इस्तेमाल नहीं करते: उसे हर जगह बंद कर दें” का चरण 1) और save करें, या Configuration logs page से बदलाव को revert करें। अगर आपका कोई phone या laptop exit node इस्तेमाल करता है, तो हर save के बाद उसका internet access test करें: exit node का गलत grant उसे काट देता है।
- लिख लें कि आपके devices को एक-दूसरे से क्या चाहिए: file shares, एक media server, एक subnet route, एक printer। Paper या एक text file इस्तेमाल करें।
- Policy की copy सहेजें, जैसा ऊपर बताया गया है।
- हर ज़रूरत के लिए एक grant जोड़ें
"grants"section में (अगर कोई नहीं है तो section जोड़ें; allow-all"acls"में है), जैसे पहले “एक example policy” में NAS का example। अगर आपने वह नाम परिभाषित नहीं किया है, तोnasकी जगह NAS का Tailscale address (Machines page उसे दिखाता है) इस्तेमाल करें। अगर आप exit nodes इस्तेमाल करते हैं, तो उनके लिए एक grant जोड़ें। - जो चलना चाहिए उसके tests जोड़ें, जैसे उसी example में। Save पर click करें। अगर कोई test fail हो, तो Tailscale बदलाव को मना कर देता है और उस test का नाम बताता है।
- Allow-all rule हटाएँ, पर
"acls"section को"acls": []के रूप में रखें: Tailscale का documentation deny-all के लिए यही form देता है और कहता है कि section छोड़ना allow-all के बराबर है। जो नहीं चलना चाहिए उसके tests जोड़ें (जैसे उस device पर ports 22, 445 और 3389, जिसे इन्हें नहीं लेना चाहिए), और Save फिर से करें। Allow-all के रहते वे tests fail होते हैं, इसीलिए इन्हें इसी चरण में जोड़ा जाता है। - हर service को test करें उस device से जो उसे इस्तेमाल करता है। अगर कोई fail हो, तो उसका grant जोड़ें, या सहेजी हुई copy वापस paste करें।
स्थिति
Version 1.104.4 को 27 अक्टूबर 2026 (UTC) की देर रात tag किया गया; Tailscale का changelog इसे 28 अक्टूबर की तारीख़ देता है। Version 1.104.5, जो 2 नवंबर 2026 को release हुआ, Tailscale SSH connection stalls और restart hangs को fix करता है, और approval की अवधि खत्म होने पर check-mode sessions का disconnect होना रोकता है; मौजूदा release पर update करें। 10 नवंबर 2026 को bulletins page (TS-2026-014 से TS-2026-017, 26 अक्टूबर की तारीख़ के) पर कोई CVE number नहीं था।
यह कैसे किया गया
मैंने यह जाँच Claude, Anthropic के AI model, के साथ की। उसने replacement policy और उसके tests का draft बनाया, और यह post भी। मेरे पहले draft की Claude की समीक्षा ने बताया कि default rule पहले से root की अनुमति देता है। Claude ने फिर इसे Tailscale के documentation से जाँचा; open-source code में default policy नहीं है।
शब्दावली
- Tailscale: WireGuard पर बना एक mesh VPN, जिसके साथ एक hosted service है जो sign-in और keys सँभालती है।
- Tailnet: एक Tailscale account के devices का समूह।
- Policy file: tailnet के access rules, जो admin console में edit होते हैं। Grants तय करते हैं कि कौन-सा device किस तक पहुँच सकता है;
sshsection तय करता है कि Tailscale SSH sessions कौन खोल सकता है; tests हर बदलाव पर rules को जाँचते हैं। - Allow-all: default
aclsrule जो हर device को बाकी हर device तक हर port पर पहुँचने देता है। - Tag:
tag:serverजैसा label, जो device को user की जगह अपनी एक अलग पहचान देता है; tagged devicesautogroup:selfके दायरे में नहीं आते। - autogroup:member / self / nonroot: tailnet का कोई भी user; वे devices जो किसी user के हैं (tagged वाले नहीं); root को छोड़कर कोई भी local account।
- Tailscale SSH: Tailscale service में बना एक SSH server, जो passwords या keys की जगह policy file से तय करता है कि कौन login कर सकता है।
- Check mode:
sshrule की एक action जो session शुरू होने से पहले user से फिर sign in करवाती है; एक sign-in default रूप से 12 घंटे चलता है। - Exit node: tailnet का एक device जिसके ज़रिए दूसरे devices अपना internet traffic भेज सकते हैं।
- root: Linux और macOS का administrator account, जो machine पर कुछ भी कर सकता है।
- Subnet route: एक device जो tailnet को अपने पीछे के पूरे local network तक पहुँचने देता है।
- Unix socket: file जैसा एक endpoint जिसे एक ही machine के programs आपस में बात करने के लिए इस्तेमाल करते हैं, जैसे Docker का control socket।
- Port forwarding (SSH में): किसी दूसरे connection को, जैसे socket तक के connection को, SSH session के ज़रिए ले जाना।
- Tailnet Lock: Tailscale का एक feature जो माँगता है कि भरोसेमंद devices हर नए device पर sign करें, तभी वह जुड़ सकता है।
- Foothold: वह device जिस पर attacker का पहले से नियंत्रण है, और जहाँ से आगे के attacks शुरू होते हैं।
- headscale: Tailscale के hosted control server का open-source विकल्प।
- CVE: किसी ख़ास vulnerability का public identifier।
- sudo: एक command prefix जो command को administrator के रूप में चलाता है; वह आपका password माँग सकता है।
- ssh: एक command जो आपको दूसरी machine में login कराती है।
स्रोत
- Tailworm report, Cyberdione Labs (24 अक्टूबर 2026, वह तारीख़ जो Tailscale देता है; report खुद सिर्फ़ “2026-10” दिखाती है): https://tailworm.com/
- Tailscale, “Tailscale SSH: Findings and fixes”, 28 अक्टूबर 2026: https://tailscale.com/blog/tailscale-ssh-findings-fixes
- Tailscale, “Tailscale SSH: Investigation”: https://tailscale.com/ssh-investigation-update
- Tailscale security bulletins, TS-2026-004, TS-2026-009 और TS-2026-014 से TS-2026-017 (10 नवंबर 2026 को फिर पढ़े गए): https://tailscale.com/security-bulletins
- The Hacker News, “Unpatched Tailscale SSH Flaws Could Let a Hacked Device Reach Root on Other Servers”, 25 अक्टूबर 2026: https://thehackernews.com/2026/10/unpatched-tailscale-ssh-flaws-could-let.html
- Tailscale docs, Tailscale SSH (check mode, बंद करना): https://tailscale.com/docs/features/tailscale-ssh
- Tailscale docs, default policy (“Allow all”): https://tailscale.com/docs/reference/examples/acls
- Tailscale docs, policy file syntax और tests: https://tailscale.com/docs/reference/syntax/policy-file
- Tailscale docs, grants syntax: https://tailscale.com/docs/reference/syntax/grants
- Tailscale docs, admin console में devices को filter करना: https://tailscale.com/docs/features/access-control/device-management/how-to/filter
- Tailscale docs, device हटाना: https://tailscale.com/docs/features/access-control/device-management/how-to/remove
- Tailscale docs, Tailscale को update करना: https://tailscale.com/docs/features/client/update
- Tailscale docs,
tailscaledservice: https://tailscale.com/docs/reference/tailscaled - Tailscale source code (SSH server, netstack, peer API,
tailscaled.service) और v1.104.4 tag: https://github.com/tailscale/tailscale
Tailscale default policy root SSH ని అనుమతిస్తుంది. Tailworm నన్ను దాన్ని చదివేలా చేసింది.
చదవడానికి 15 నిమిషాలు
Code, commands, సాంకేతిక పదాలను ఇంగ్లీష్లోనే ఉంచాను.
మీ మీద ప్రభావం ఉందా? Tailworm SSH findings, Tailscale SSH నడిపే device మీద మాత్రమే వర్తిస్తాయి; ఏ device అయినా దాన్ని నడిపేది, ఎవరైనా tailscale set --ssh తో, లేదా దాన్ని wrap చేసే app లోని switch తో, on చేసినప్పుడు మాత్రమే. Windows, iPhone, Android, Mac app, Synology, QNAP devices దాన్ని నడపలేవు. Tailscale documentation ఆ server ని Linux కోసం, open-source command-line build లో macOS కోసం కూడా పేర్కొంటుంది; source code దాన్ని FreeBSD, OpenBSD కోసం కూడా build చేస్తుంది. కొన్ని NAS, router software లో దానికి ఒక switch ఉంటుంది: ఏ devices దాన్ని నడుపుతున్నట్లు report చేస్తున్నాయో admin console లోని Machines page చూపిస్తుంది (చెక్ లో 2వ step). Tailscale తన సొంత post లో వివరించిన vulnerabilities ని version 1.104.4 లేదా ఆ తర్వాతిది fix చేస్తుంది; report లోని పదకొండు findings లో కొన్ని headscale కు లేదా విడుదల కాని code కు సంబంధించినవి. ఏ device అయినా server నడిపితే, ఆ device ని update చేయండి.
ఇది వేరే విషయం: మీరు మీ Tailscale access controls ని ఎప్పుడూ edit చేయకపోతే, default policy వల్ల server నడిపే మీ సొంత devices లో దేని మీదైనా, browser లో మళ్ళీ sign in అయిన తర్వాత, root గా (administrator account) Tailscale SSH session తెరవగలరు. Tag లేని మీ devices లో ఒకదాన్ని (tag అంటే tag:server వంటి label; చాలా home devices కి ఏదీ ఉండదు) ఆక్రమించిన ఎవరైనా అదే చేయగలిగే అవకాశం ఉంది; default rule tagged devices కి వర్తించదు. ఏ device కూడా server నడపకపోతే, ఈ రోజు ఆ rule కి పని చేయడానికి ఏమీ లేదు; ఇది చక్కదిద్దే పని, అత్యవసరం కాదు. ssh section ని delete చేస్తే అది మూసుకుపోతుంది. కింద ఉన్న ఐదు నిమిషాల చెక్ దీన్ని సురక్షితమైన క్రమంలో ఎలా చేయాలో చూపిస్తుంది.
నేను నా tailnet (నా Tailscale network) ని సృష్టించినప్పుడు Tailscale రాసిన access policy, నా సొంత devices మీద root SSH session ని అనుమతించింది. దాన్ని నేను ఎప్పుడూ తెరిచి చూడలేదు. AI model అయిన Claude, ఈ post యొక్క నా మొదటి draft ని review చేసినప్పుడు దాన్ని ఎత్తి చూపింది; అప్పుడు మేము నా network ని Tailworm report తో పోల్చి చెక్ చేస్తున్నాము.
Tailworm అనేది 24 అక్టోబర్ 2026 వారాంతంలో ప్రచురితమైన ఒక report: Tailscale, headscale లలో పదకొండు findings; వాటిలో అత్యంత తీవ్రమైనది Tailscale లోని built-in SSH server లో. Researcher lab లో, ఒక device ని అదుపులో ఉంచుకున్న attacker, ఆ device ని లోపలికి అనుమతించే rule కింద Tailscale SSH నడిపే ఇతర machines మీద root అయ్యాడు. Report వచ్చినప్పుడు Tailscale ఇంకా fix విడుదల చేయలేదు.
కింద మీ సొంత tailnet కోసం ఐదు నిమిషాల చెక్ ఉంది. Attack కి ఏం కావాలో, నేను ఏం కనుగొన్నానో దాని తర్వాత వస్తాయి.
Command line కొత్తా? Boxes ని ఎలా చదవాలి
PS> అంటే: Windows లో PowerShell లో టైప్ చేయండి (Start menu → powershell అని టైప్ చేయండి → Enter). $ అంటే: Linux లేదా Mac లోని terminal లో, లేదా ssh (వేరే machine లోకి login చేయించే command) తో login అయిన తర్వాత remote machine లో టైప్ చేయండి. $ లేదా PS> ని టైప్ చేయకండి.
$ లేదా PS> తో మొదలయ్యే ప్రతి line ఒక command. ఆ $ ని click చేస్తే ఆ line మాత్రమే copy అవుతుంది; దాన్ని paste చేసి, Enter నొక్కి, అది పూర్తయ్యే వరకు ఆగి, ఆ తర్వాతే తదుపరిదానికి వెళ్ళండి. పైన Copy button ఉన్న box లో ఒక command (లేదా ఒక file) ఉంటుంది, కాబట్టి దాన్ని మొత్తం copy చేయండి. Dashed box మీకు తిరిగి కనిపించాల్సిన దాన్ని చూపిస్తుంది; దాన్ని మీరు టైప్ చేయరు.
మీ సొంత tailnet కోసం ఐదు నిమిషాల చెక్
మొదలుపెట్టే ముందు
- మీకు కావాల్సినవి: ఒక computer (phone మీద ఈ steps ఇబ్బందిగా ఉంటాయి), ఒక browser, Owner లేదా Admin role తో మీ tailnet కి sign-in (Network admin devices ని remove చేయలేరు; IT admin policy ని edit చేయలేరు).
- ఎంత సమయం, ఎలా undo చేయాలి: “చూడండి” కి సుమారు ఐదు నిమిషాలు; అది ఏదీ మార్చదు. Policy లో ప్రతి మార్పు దాని saved copy తో మొదలవుతుంది, ప్రతి box అది చూడటం మాత్రమేనా లేక ఏదైనా మారుస్తుందా అని చెబుతుంది.
చూడండి: ఏదీ మారదు
- Admin console ని తెరవండి. Web browser తెరిచి,
console.tailscale.com/admin/machinesకి వెళ్ళి, మీ tailnet కి యజమాని అయిన account తో sign in అవ్వండి. ఇది ఒక page ని మాత్రమే తెరుస్తుంది, సుమారు ఒక నిమిషం పడుతుంది. మీ devices table కనిపించాలి. Page తెరవకపోతే, మీ account కి Owner లేదా Admin role లేకపోవచ్చు; ఆ role ఉన్నవారిని అడగండి. - Tailscale SSH నడిపే devices ని కనుగొనండి. Table పైన Filters ని click చేసి, Property ని, ఆ తర్వాత Tailscale SSH ని ఎంచుకోండి. Server నడుపుతున్నట్లు report చేసే devices కి మాత్రమే table తగ్గుతుంది. Table ఖాళీగా ఉంటే ఏ device నడపడం లేదని అర్థం. Filters కనిపించకపోతే, Tailscale యొక్క devices ని filter చేయడం గురించిన page చూడండి.
- ఐచ్ఛికం: ఒక device మీద నిర్ధారించుకోండి. ఈ list కింద ఉన్న collapsed block, Linux లో లేదా command-line build ఉన్న Mac లో ఎలా చేయాలో చూపిస్తుంది.
- మీ policy ని చదవండి. Console పై menu లో Access controls ని click చేయండి. Visual editor తెరిస్తే JSON editor కి మారండి. Text లోపల click చేసి, Ctrl+F (Mac లో Cmd+F) నొక్కి,
"ssh"అని టైప్ చేసి Enter నొక్కండి. Match లేకపోతే policy లో SSH rule లేదని అర్థం, మీరు కింద ఉన్న “అందరికీ” కి వెళ్ళవచ్చు. కింద “నేను ఎప్పుడూ రాయని policy” లో చూపిన rule లా కనిపించే match ఉంటే, మీ policy మీ సొంత devices మీద root sessions ని అనుమతిస్తున్నట్లు; అది వేరేగా కనిపిస్తే, దాని"users"line ని చదవండి: దానిలోrootఉంటే root sessions ని అనుమతిస్తుంది. 2వ step లో devices కనిపిస్తే, కింద ఉన్న “మీరు Tailscale SSH వాడితే” కి వెళ్ళండి; దాని table ఖాళీగా ఉంటే, “మీరు Tailscale SSH వాడకపోతే” కి వెళ్ళండి.
ఐచ్ఛికం: ఒక device మీద నిర్ధారించుకోండి (Linux, లేదా command-line build ఉన్న Mac)
Terminal తెరవండి: Mac లో Cmd+Space నొక్కి, terminal అని టైప్ చేసి Enter నొక్కండి; Linux లో మీ terminal app ని తెరవండి, లేదా ssh <your-user>@<device-address> తో remote machine లోకి login అవ్వండి (Windows లోని PowerShell లో కూడా ssh పని చేస్తుంది). ఆ తర్వాత కింది command ని నడపండి. grep -i runssh RunSSH ని పేర్కొనే line ని మాత్రమే ఉంచుతుంది.
tailscale debug prefs | grep -i runsshవెంటనే జవాబు ఇస్తుంది.
"RunSSH": false,true అంటే device server ని నడుపుతోంది. ఏమీ print కాకపోతే, లేదా shell tailscale: command not found అని చెబితే, 2వ step ని ఆధారం చేసుకోండి: Mac app, Windows server ని నడపలేవు.
Tailworm కి ఏం కావాలి
Attack కి ఏమేం కావాలో లిస్ట్ చేసి, ప్రతి అంశాన్ని నా సొంత setup తో చెక్ చేశాను.
ఒక Tailscale account లోని devices కలిసి ఒక tailnet అవుతాయి; ఏ device ఏ device ని చేరుకోవచ్చో admin console లోని policy file నిర్ణయిస్తుంది.
Tailscale SSH అనేది Tailscale service లోపల ఉండే SSH server; tailscale set --ssh తో device మీద అది మొదలవుతుంది. ఎవరు login కావచ్చో, ఏ local account గా కావచ్చో password గానీ key గానీ కాదు, policy file నిర్ణయిస్తుంది. Report ప్రకారం, అలాంటి session ఒక Unix socket (ఒకే machine లోని programs ఒకదానితో ఒకటి మాట్లాడుకోవడానికి వాడే file లాంటి ఒక మార్గం) ని forward చేసినప్పుడు, ఆ పనిని Tailscale service root హక్కులతో చేసింది; check కి, socket వాడకానికి మధ్య ఉన్న సమయం, దాన్ని పరిమితం చేయడానికి పెట్టిన checks ని దాటేసింది. సాధారణ user గా లోపలికి అనుమతి పొందిన session root గా పని చేయగలిగింది.
SSH attack కి మూడు విషయాలు కావాలి:
- Tailscale SSH నడుపుతున్న ఒక target device.
- Attacker device ఆ target మీద SSH session తెరవడానికి, forwarding అనుమతితో సహా, అనుమతించే policy file లోని ఒక rule.
- ఆ rule కిందకు వచ్చే ఒక device ని ఇప్పటికే అదుపులో ఉంచుకున్న attacker.
మూడోది Tailworm ఇవ్వదు; attacker దాన్ని తానే తెచ్చుకుంటాడు: లోపం ఉన్న web application, హానికరమైన package, phishing, దొంగిలించిన passwords. ఇది open internet నుంచి వచ్చే attack కాదు.
నేను కనుగొన్నది
| Attack కి కావాల్సింది | నేను కనుగొన్నది | మీ దాంట్లో ఎక్కడ చూడాలి |
|---|---|---|
| Target మీద Tailscale SSH నడుస్తుండటం | నేను చెక్ చేసినప్పుడు నా devices లో దేని మీదా నడవడం లేదు | Admin console లోని Machines page, “Tailscale SSH” property తో filter చేసి (చెక్ లో 2వ step) |
| SSH session ని అనుమతించే policy rule | ఉంది: default rule. నా సొంత devices మీద root గా లేదా సాధారణ account గా, మళ్ళీ sign in అయిన తర్వాత | Policy file (చెక్ లో 4వ step) |
| Rule కిందకు వచ్చే device మీద foothold | ఏ network లోనైనా లాగే సాధ్యమే | — |
| ఇతర findings | అవి సంబంధించిన features కే వర్తిస్తాయి: app connectors, tailscale serve, ప్రతి client చేసే relay connection, headscale (Tailscale hosted control server కి open-source ప్రత్యామ్నాయం) |
Admin console |
అంటే attack కి కావాల్సిన మొదటిది లేదు. రెండోది, session ని అనుమతించే rule, default గానే ఉంది. Socket attack కి కావాల్సిన forwarding ని default rule అనుమతిస్తుందో లేదో Tailscale documentation చెప్పదు.
లోతుగా: ప్రతి అంశాన్ని చెక్ చేయడానికి ఇతర మార్గాలు
- మీరు OPNsense నడిపితే. Tailscale plugin తన settings ని ఒక API వెనుక ఉంచుతుంది. Read-only call
GET /api/tailscale/settings/get, SSH server off గా ఉన్నప్పుడు"enableSSH":"0"ఇస్తుంది. Tailscale documentation SSH server ని Linux, macOS కోసం మాత్రమే పేర్కొంటుంది, కానీ దాని source code FreeBSD, OpenBSD కోసం కూడా build చేస్తుంది, OPNsense plugin లో దానికి ఒక switch ఉంది. - ప్రతి device. Admin console లో: Machines → Filters → Property → Tailscale SSH. ఏ device కూడా సరిపోకపోతే, ఏ device కూడా server నడుపుతున్నట్లు report చేయడం లేదు.
- Linux device, లోపలి నుంచి.
--sshswitchRunSSHఅనే preference ని set చేస్తుంది. Server off గా ఉన్నప్పుడుtailscale debug prefs | grep -i runssh"RunSSH": falseచూపిస్తుంది.tailscale set --ssh=falseదాన్ని off చేస్తుంది. - Versions. Report 1.104.2 ని test చేసింది; అంతకంటే ముందు versions గురించి ఏమీ చెప్పదు. Tailscale fix 1.104.4 లో ఉంది.
లోతుగా: report ఏం కనుగొంది, Tailscale ఏం చెప్పింది
- ఏం test చేశారు. Tailscale 1.104.2, headscale 0.29.5 (Tailscale hosted control server కి open-source ప్రత్యామ్నాయం), ఏ మార్పూ లేకుండా, ఒక lab లో, 22 నుంచి 24 అక్టోబర్ 2026 వరకు.
- Findings 1 నుంచి 3, SSH socket forwarding. Unix sockets యొక్క local, remote forwarding (
ssh -L,ssh -R) ని root గా నడిచే Tailscale service చేసింది. Path check ఒక క్షణంలో జరిగింది, socket ని వాడింది మరో క్షణంలో; ఆ రెండింటి మధ్య ఉన్న సమయంలో జరిగిన race ని session లోపల వేగంగా తిరిగే ఒక loop గెలిచింది. Lab లో దీని వల్ల Docker socket ద్వారా root దొరికింది, root కి చెందిన sockets ని attacker వాటితో మార్చారు, కొత్త devices ని enrol చేయడానికి వాడే ఒక key ని పట్టుకున్నారు; ఆ key తో attacker machine network లో చేరింది. ఆ చివరి step ని Tailnet Lock off గా ఉన్నప్పుడు మాత్రమే report మొదటి నుంచి చివరి వరకు చూపించింది. Tailnet Lock on గా ఉన్నప్పుడు, lock ని disable చేయడానికి కావాల్సిన material ని పట్టుకుంది, కానీ దాన్ని వాడలేదు. - Finding 5, SSH memory exhaustion. Login అయిన ఒక session, root గా నడిచే Tailscale service ని memory ని allocate చేస్తూనే ఉండేలా చేయగలిగింది.
- Tailscale ఏం చెప్పింది. ఈ issues కి “require urgent attention” (తక్షణ శ్రద్ధ అవసరం) అని, SSH vulnerabilities “primarily concerned how permissions were enforced” (ప్రధానంగా permissions ని ఎలా అమలు చేశారన్నదానికి సంబంధించినవి) అని, అది connection authorize అయిన తర్వాత జరిగేదని చెప్పింది; ఈ issues worm కిందకు వస్తాయన్నదాన్ని అంగీకరించదు; దీన్ని policy ఇప్పటికే అనుమతించే connections కి పరిమితమైన lateral movement అంటుంది.
- Worm లాగా వ్యాపించే అవకాశం. Lab లో, ఒక compromised device, policy అనుమతించిన ప్రతి device ని, ఒక్కో step కి ఒక సెకనులోపే చేరుకుంది. వ్యాప్తిని ఆపిన ఒక control ని report పేర్కొంటుంది: ఒక source నుంచి ఒక destination కి అని రాసిన rules. Hardware లో ఉంచిన keys (TPM లేదా Secure Enclave) దొంగిలించిన device identity ఎక్కువ కాలం నిలవకుండా ఆపాయి.
- ఇతర findings లో. Traffic ఎక్కడికి వెళ్తోందో check చేయని ఒక app-connector design (ఈ version, Conn25, ఇంకా విడుదల కాలేదని Tailscale చెబుతోంది); service యొక్క సొంత control socket కి
tailscale serveforward చేయడం; relay client లో memory exhaustion (దానికి bulletin నాకు కనిపించలేదు); headscale మీద denial of service. - Bulletins. Tailscale నాలుగు ప్రచురించింది, అన్నీ 26 అక్టోబర్ తేదీతో, అన్నీ 1.104.4 లో fix అయ్యాయి: TS-2026-014 (SSH socket forwarding; Tailscale ఇప్పుడు root గా కాకుండా login అయిన user గా forward చేస్తుంది), TS-2026-015 (SSH memory exhaustion), TS-2026-016 (privileged sockets ని చేరుకునే
tailscale serve), TS-2026-017 (HTTP/2 మీద Serve, ఒక mount యొక్కTailscale-App-Capabilitiesvalues ని అదే node మీద ఉన్న మరో mount కి పంపగలిగేది). Device ని update చేసే వరకు, forwarding లోపానికి Tailscale సూచించే mitigation, Tailscale service యొక్క environment లోTS_SSH_DISABLE_FORWARDING=1పెట్టడం; “ఆ తర్వాత, మీరు కనుగొన్నదాన్ని మార్చండి” లోని stopgap అది ఎలాగో చూపిస్తుంది. - ఇదే ప్రాంతంలో ముందటి fixes. జూన్, జూలై bulletins ఇప్పటికే symlink permissions ని పాటించని SSH socket forwarding (TS-2026-004, 3 జూన్),
autogroup:nonrootని దాటే ఒక మార్గం (TS-2026-009, 13 జూలై) ని కవర్ చేశాయి; రెండూ 1.98.9 లో fix అయ్యాయి. - Forwarding, default rule. Tailscale SSH server, సరిపోలిన rule లో Tailscale coordination server నుంచి వచ్చిన forwarding permission ఉన్నప్పుడు మాత్రమే forward చేస్తుంది (source code లో
allowLocalPortForwarding,allowRemotePortForwarding). Policy దాన్ని ఎలా ఇస్తుందో, default rule ఇస్తుందో లేదో Tailscale public documentation చెప్పదు. Tailscale hosted service లో per-rule forwarding fields ని false గా set చేయమని report చెబుతుంది కానీ వాటి పేర్లు చెప్పదు; Tailscale policy documentation లో నాకు అవి కనిపించలేదు. ఈ issue “allow local or remote forwarding in their access policies” (తమ access policies లో local లేదా remote forwarding ని అనుమతించే) users ని ప్రభావితం చేస్తుందని bulletin TS-2026-014 చెబుతోంది. - Disclosure. శనివారం 24 అక్టోబర్ ఉదయం report అందిందని, రెండు గంటల తర్వాత report ప్రచురితమైందని Tailscale చెబుతోంది; అప్పటికే అది సంబంధిత issues ని పరిశీలిస్తోంది. Researcher దీన్ని “reported but not coordinated” (report చేశారు కానీ సమన్వయం చేయలేదు) అని వర్ణించినట్లు The Hacker News రాసింది.
నేను ఎప్పుడూ రాయని policy
మీరు tailnet సృష్టించినప్పుడు, Tailscale దానికి ఒక default policy ఇస్తుంది. దాని documentation దాన్ని ఇలా వివరిస్తుంది: ప్రతి device ప్రతి ఇతర device ని ప్రతి port మీద చేరుకోవచ్చు (దీన్ని కింద allow-all అంటాను), ప్రతి user తన సొంత devices మీద check mode లో root గా లేదా సాధారణ user గా Tailscale SSH session తెరవవచ్చు. SSH భాగం ఇలా ఉంటుంది:
"ssh": [
  {
    "action": "check",
    "src":    ["autogroup:member"],
    "dst":    ["autogroup:self"],
    "users":  ["autogroup:nonroot", "root"]
  }
]
Tailnet లోని ఏ user అయినా (autogroup:member) తనకు చెందిన devices కి (autogroup:self; tagged devices చేరవు), root తప్ప ఏ local account గా (autogroup:nonroot) అయినా, లేదా root గా connect కావచ్చు. నా దాంట్లో ఈ rule ఉంది, దానితో పాటు allow-all కూడా. Tailscale యొక్క policy-file page default ssh rule ని autogroup:nonroot తో వివరిస్తుంది, root ని పేర్కొనదు; దాని SSH page, దాని ఉదాహరణ policies లో root ఉంది, పైన చూపినట్లు.
నన్ను, నా devices లో ఒకదాన్ని ఆక్రమించిన వ్యక్తిని ఈ rule వేరు చేసి చూడలేదు. Tailscale దృష్టిలో నా devices లో ఒకదాని నుంచి వచ్చే connection నేనే. Tailnet లోని ఒక Linux device లో tailscale set --ssh నడిచి ఉంటే, నా మరో device ని ఆక్రమించిన వ్యక్తి ఆ device మీద root session తెరవగలడు. అది rule design ప్రకారం పని చేయడమే, లోపం కాదు. Check mode నా browser sign-in ని అడుగుతుంది, ఒక approval 12 గంటల పాటు అమలులో ఉండవచ్చు (కింద చూడండి).
Session మొదలవక ముందు check mode browser లో కొత్త sign-in అడుగుతుంది. Default check period తో, ఒక check-mode sign-in తో ఆ device ని, tailnet లోని ఇతర ఏ device ని అయినా మళ్ళీ sign in కాకుండానే 12 గంటల పాటు చేరుకోవచ్చని Tailscale documentation చెబుతుంది. అది వేరే device నుంచి తెరిచిన session కి కూడా వర్తిస్తుందో లేదో అది చెప్పదు. ఒక device మీద ఉన్న attacker మీ తదుపరి approval కోసం ఎలా వేచి ఉండవచ్చో, లేదా దాన్ని ఇవ్వమని మిమ్మల్ని ఎలా prompt చేయవచ్చో report వివరిస్తుంది; కాబట్టి check mode దీన్ని నెమ్మదింపజేస్తుంది, ఆపదు.
సాధారణ account ని root గా మార్చడానికి Tailworm కి socket forwarding కావాల్సి వచ్చింది. Default rule కి ఏదీ అక్కర్లేదు, ఒక check-mode approval చాలు. ఇది documentation లో ఉన్న ప్రవర్తనే, vulnerability కాదు. 1.104.4 కి update చేయడం కూడా దీన్ని మార్చదు: root గా లోపలికి అనుమతించిన session design ప్రకారమే root.
నేను ఏం మార్చాను
Policy. కొత్త దాంట్లో ssh section లేదు. SSH rules ని తొలగిస్తే tailnet అంతటా Tailscale SSH disable అవుతుందని Tailscale documentation చెబుతుంది. Allow-all స్థానంలో అవసరమైనది మాత్రమే grants తో ఇవ్వవచ్చు, ఉదాహరణకు:
- Exit nodes వాడితే:
autogroup:internetకి access. - మీరు manage చేయాల్సిన కొన్ని devices, అంతకు మించి ఏమీ కాదు. ఈ grant ని పరిమితంగా ఉంచండి: అది కవర్ చేసే ప్రతి device చేరుకునేలానే ఉంటుంది.
Allow-all ని మార్చడానికి ఒక మూల్యం ఉంది: devices ఒకదాన్ని ఒకటి చేరుకోవడం మీద ఆధారపడిన ప్రతిదీ ఆగిపోతుంది, ఉదాహరణకు file sharing, media server, subnet route. ముందుగా వాటిలో ప్రతిదానికి సొంత grant ఇవ్వండి.
ఆ తర్వాత tests. Policy file లో tests ఉండవచ్చు: “ఈ user ఈ port ని చేరుకోవచ్చు” వంటి statements; file మారినప్పుడల్లా Tailscale వాటిని check చేస్తుంది. ఏదైనా test fail అయితే ఆ మార్పును తిరస్కరిస్తుంది. ఏది పని చేయాలో, ఏది తిరస్కరించబడాలో tests చెప్పగలవు; ఉదాహరణకు అవసరం లేని device మీద SSH, file sharing, remote desktop (ports 22, 445, 3389) తిరస్కరించబడాలని.
లోతుగా: ఒక ఉదాహరణ policy
ఇది ఒక ఆకృతి, template కాదు. Exit nodes తప్ప మిగతావన్నీ కట్ చేస్తుంది; ఉన్నది ఉన్నట్లు paste చేస్తే, మీ సొంత NAS నుంచి, media server నుంచి మిమ్మల్ని కట్ చేస్తుంది. Addresses, e-mail placeholders మాత్రమే.
{
  "grants": [
    // 1. Use exit nodes.
    {"src": ["autogroup:member"], "dst": ["autogroup:internet"], "ip": ["*"]},

    // 2. Add a grant for each device you must reach, and no more.

    // Nothing else: other devices accept no inbound tailnet traffic.
  ],

  // An empty "acls" list: Tailscale's documentation gives this form for deny-all;
  // omitting the section is documented as allow-all.
  "acls": [],

  // No "ssh" section: no Tailscale SSH session is allowed anywhere.

  "tests": [
    {
      "src":    "you@example.com",
      // "accept": ["100.x.y.2:445"],  one line like this for each thing that must work.
      "deny":   ["100.x.y.3:22", "100.x.y.3:445", "100.x.y.3:3389"], // a device that must refuse these
    },
  ],
}
మీ tailnet లోని users కి file shares అందించాల్సిన, అంతకు మించి ఏమీ చేయని NAS కోసం grant ఇలా ఉంటుంది (port ఒక ఉదాహరణ; అది అందించాల్సిన ప్రతి ఇతర service కోసం ఒక tcp: entry ని చేర్చండి; nas అనేది policy యొక్క hosts section లో మీరు నిర్వచించే పేరు, ఉదాహరణకు "hosts": {"nas": "100.x.y.2"}):
{"src": ["autogroup:member"], "dst": ["nas"], "ip": ["tcp:445"]},గమనికలు:
autogroup:internetకి access ఉన్న devices మాత్రమే exit nodes ని వాడగలవు; అందుకే grant 1 అలా రాసి ఉంది.- Tests rules ని check చేస్తాయి, network ని కాదు: test pass అయినంత మాత్రాన device స్పందిస్తుందని రుజువు కాదు.
"acls": []ఎందుకు ఉంచాలి.aclssection ని వదిలేస్తే అది default allow-all policy తో సమానమని Tailscale documentation చెబుతుంది, దాని deny-all ఉదాహరణ"acls": []. Grants ఉన్న policy లో వదిలేయడానికి అర్థం ఏమిటో అది చెప్పదు. ఖాళీ list ని ఉంచి tests నిర్ణయించనివ్వండి: allow-all తెరిచే port కోసం deny test, allow-all అమలులో ఉన్నంత వరకు fail అవుతుంది.- Save చేసే ముందు పాత policy కాపీ ఉంచుకోండి (కింద “మీరు Tailscale SSH వాడకపోతే: అన్ని చోట్లా off చేయండి” లోని 1వ step ఇది చేస్తుంది). Configuration logs page నుంచి ఒక మార్పును revert చేయడానికి కూడా Tailscale అనుమతిస్తుంది.
లోతుగా: నేను మళ్ళీ వాడే పద్ధతి
Attack కి ఏం కావాలో list చేయండి; ప్రతి అంశాన్ని మీ సొంత devices మీద check చేసి, ఎలా చేశారో రాసుకోండి; attack వర్తించని చోట కూడా ఏది తప్పుగా ఉందో వెతకండి; మిగిలిన వాటిని ఏం మార్చాలి, ఏం గమనించాలి, ఏ risk ని అంగీకరించాలి అని విభజించండి.
ఆ తర్వాత, మీరు కనుగొన్నదాన్ని మార్చండి
మీరు Tailscale SSH వాడకపోతే: అన్ని చోట్లా off చేయండి
మొదలుపెట్టే ముందు: ఇది మీ policy ని మారుస్తుంది, తద్వారా ఏ device కూడా Tailscale SSH session ని అంగీకరించదు. ఏదైనా machine లోకి Tailscale SSH ఒక్కటే మీ దారి అయితే దీన్ని చేయకండి. సుమారు మూడు నిమిషాలు పడుతుంది. Undo చేయడానికి, saved copy ని తిరిగి paste చేసి (1వ step) save చేయండి, లేదా Configuration logs page నుంచి ఆ మార్పును revert చేయండి.
- Policy కాపీ save చేయండి. JSON editor లో text లోపల click చేసి Ctrl+A (Mac లో Cmd+A) నొక్కి, ఆ తర్వాత Ctrl+C (Cmd+C) నొక్కండి. Notepad (Start menu →
notepadఅని టైప్ చేయండి → Enter) లేదా Mac లో TextEdit (ముందు Format → Make Plain Text) తెరిచి, Ctrl+V (Cmd+V) తో paste చేసి, ఫైల్ ని మీ Documents folder లోpolicy-backup.jsonగా save చేయండి. File లో మొత్తం policy ఉండాలి, అది{తో మొదలవుతుంది. sshsection ని delete చేయండి. Console కి తిరిగి వచ్చి,"ssh": [నుంచి దాని కింద వరుసలో ఉన్న]వరకు (rule లోపలి]కాదు), దాని తర్వాత comma ఉంటే దానితో సహా, అన్నీ select చేసి Delete నొక్కండి. Policy file ఒక అదనపు comma ని అనుమతిస్తుంది. మిగిలిన sections ని ఉన్నట్లే వదిలేయండి.- Save. Save ని click చేయండి. మార్పును అమలు చేసే ముందు Tailscale policy ని, దానిలోని tests ని check చేస్తుంది. Save అయిందని console నిర్ధారించడం కనిపించాలి. Syntax error అని చెబితే, ఏదో comma లేదా bracket చోటు తప్పింది: saved copy ని తిరిగి paste చేసి 2వ step నుంచి మళ్ళీ చేయండి. అది ఒక
sshTestsentry ని పేర్కొంటే, ఆ test ని కూడా delete చేయండి. - Check. Page ని reload చేసి, Ctrl+F (Cmd+F) నొక్కి
"ssh"కోసం వెతకండి. Match ఉండకూడదు. Opt in అయిన device మీద మీరుtailscale set --ssh=falseనడిపే వరకు అది server ని నడుపుతూనే ఉంటుంది.
మీరు Tailscale SSH వాడితే: update చేసి, ఆ తర్వాత rule ని కుదించండి
మొదలుపెట్టే ముందు: update చేస్తే ఆ device మీద తెరిచి ఉన్న ప్రతి Tailscale SSH session ముగుస్తుంది. Tailscale SSH session నుంచి update ని నడపకండి. లోపలికి వేరే దారి వాడండి: machine కి keyboard, screen కలిపి, లేదా మీ local network లో సాధారణ ssh login. Device యొక్క Tailscale address (100.…) కి చేసిన ssh login కూడా Tailscale restart అయినప్పుడు తెగిపోతుంది, update మధ్యలో తెగిపోతే install కి అంతరాయం కలగవచ్చు. కింది commands Tailscale యొక్క సొంత package repository ఉన్న Debian, Ubuntu, Raspberry Pi OS కోసం. ఇతర systems కోసం, Tailscale యొక్క update చేయడం గురించిన page చూడండి.
- వేరే దారిలో device లోకి login అవ్వండి, దానిపై terminal తెరవండి. దాని shell prompt కనిపించాలి.
- అది ఏ version నడుపుతోందో చూడండి.
tailscale versionమొదటి line version number. 1.104.4 లేదా ఆ తర్వాతి దాంట్లో fixes ఉన్నాయి. అంతకంటే తక్కువైతే update కావాలి.
- Update.
sudoఒక command ని administrator గా నడుపుతుంది, మీ password అడగవచ్చు; టైప్ చేస్తున్నప్పుడు ఏదీ కనిపించదు, కాబట్టి టైప్ చేసి Enter నొక్కండి.
sudo apt update
sudo apt install --only-upgrade tailscale
ప్రతిదానికి ఒక నిమిషం లోపు పడుతుంది. Tailscale కొన్ని సెకన్ల పాటు restart అవుతుంది. Update మధ్యలో ఆగిపోతే, sudo dpkg --configure -a దాన్ని పూర్తి చేస్తుంది. tailscale ఇప్పటికే newest version అని apt చెబితే, ఆ device లో fix ఉంది, లేదా అది Tailscale ని Tailscale repository నుంచి తీసుకోలేదు.
tailscale versionతో మళ్ళీ check చేయండి. మొదటి line లో 1.104.4 లేదా ఆ తర్వాతిది ఉండాలి.- Rule ని కుదించండి. మీరు ఏదైనా host లో, ఉదాహరణకు Proxmox server లో, root గా login అవుతుంటే, లేదా
sudoఉన్న మరో account లేని host లో, ఇది ఆ access ని తొలగిస్తుంది: ముందు check చేయండి. Edit చేసే ముందు policy కాపీ save చేయండి (“మీరు Tailscale SSH వాడకపోతే: అన్ని చోట్లా off చేయండి” లోని 1వ step). ఆ తర్వాత console లో Access controls, JSON editor కి వెళ్ళి, మీsshrule లోని"users"line ని కనుగొని, దాని నుంచి, "root"ని delete చేయండి:
"users": ["autogroup:nonroot", "root"]"users": ["autogroup:nonroot"]Save ని click చేయండి. ఇప్పుడు rule root sessions ని ఇవ్వదు; login అయిన తర్వాత sudo వాడండి. మీ account కి password లేని sudo ఉన్న host లో, ఇది attacker ని నెమ్మదింపజేస్తుంది, ఆపదు. ఇది update కి ప్రత్యామ్నాయం కాదు: జూలై bulletin TS-2026-009 autogroup:nonroot ని దాటే మార్గం. అలాగే src, dst లను SSH అవసరమైన వ్యక్తులకు, devices కు పరిమితం చేయండి.
Stopgap: update చేయలేని device మీద SSH forwarding ని off చేయండి
మీరు వాడే package source ఇంకా 1.104.4 లేదా ఆ తర్వాతిది ఇవ్వని చోట మాత్రమే దీన్ని వాడండి. Forwarding లోపానికి Tailscale సూచించే mitigation, Tailscale service యొక్క environment లో TS_SSH_DISABLE_FORWARDING=1 setting. Debian-style installs లో service /etc/default/tailscaled ని చదువుతుంది (Tailscale source లోని tailscaled.service file దాన్ని EnvironmentFile గా పేర్కొంటుంది). కింది commands ని ఆ file కాపీల మీద test చేశాను, నడుస్తున్న Tailscale service మీద కాదు. Restart వల్ల తెరిచి ఉన్న Tailscale SSH sessions ముగుస్తాయి, కాబట్టి వీటిని లోపలికి వేరే దారి నుంచి నడపండి. ఈ commands systemd ఉందని ఊహిస్తాయి.
- File ని back up చేయండి. Command
No such file or directoryఅని చెబితే, ఈ device ఆ setting ని వేరే చోట ఉంచుతుంది; ఆగి, మీ install కోసం Tailscale page ని చదవండి. ఒక్కసారే నడపండి: రెండోసారి నడిపితే backup, edit చేసిన file తో మారిపోతుంది.
sudo cp /etc/default/tailscaled /etc/default/tailscaled.bak- Setting ని చేర్చండి. File లోని చివరి line తో కలిసిపోకుండా ఉండటానికి ఈ line ఒక ఖాళీ line తో మొదలవుతుంది.
printf '\nTS_SSH_DISABLE_FORWARDING=1\n' | sudo tee -a /etc/default/tailscaledఇది చేర్చినదాన్ని print చేస్తుంది. ఒక్కసారే నడపండి: రెండోసారి నడిపితే line రెండుసార్లు చేరుతుంది.
- Service ని restart చేయండి.
sudo systemctl restart tailscaled- నడుస్తున్న service కి అది ఉందో check చేయండి.
sudo cat /proc/$(systemctl show -p MainPID --value tailscaled)/environ | tr '\0' '\n' | grep TS_SSHTS_SSH_DISABLE_FORWARDING=1Output లేకపోతే service ఆ setting ని తీసుకోలేదని అర్థం: ఆ line file లో ఉందో grep TS_SSH /etc/default/tailscaled తో check చేసి, ఆ తర్వాత 3వ step ని మళ్ళీ చేయండి. /proc/0/environ: No such file or directory అంటే service నడవడం లేదు.
- Undo చేయడానికి, ఆ line ని తొలగించి restart చేయండి. Device 1.104.4 లేదా ఆ తర్వాతిది నడిపినప్పుడు కూడా ఇలా చేయండి; ఆ setting ఒక stopgap. 1వ step తర్వాత package upgrade ఆ file ని మార్చేసినా, line ని తొలగించడం సురక్షితమే; backup ఒక record గా మిగులుతుంది. Upgrade, మీరు edit చేసిన file ని ఉంచాలా అని అడగవచ్చు:
sudo sed -i '/^TS_SSH_DISABLE_FORWARDING=1$/d' /etc/default/tailscaled
sudo systemctl restart tailscaled
sed file ని చదవలేనని చెబితే, ఈ device లో undo చేయాల్సింది ఏమీ లేదు.
అందరికీ
- ఇక మీరు చూసుకోని devices ని, అవి మీ చేతుల్లోంచి వెళ్ళే ముందే, remove చేయండి. Tailscale ద్వారా మాత్రమే చేరగలిగే device ని remove చేయకండి: దాన్ని తిరిగి add చేయడానికి మీరు ఆ machine దగ్గర ఉండాలి. Console లో Machines ని తెరిచి, search bar లో పేరుతో device ని కనుగొని, దాని పక్కన menu ని తెరిచి, Remove ని, ఆ తర్వాత dialog లో Remove machine ని ఎంచుకోండి. Device list నుంచి మాయమవుతుంది. పొరపాటున ఒకదాన్ని remove చేస్తే, తిరిగి add చేయడానికి ఆ device ని మళ్ళీ sign in చేయండి; మీ tailnet కి device approval అవసరమైతే, admin approve చేయాలి.
- Allow-all ని మళ్ళీ చూడండి. Access controls లో
"acls","grants"కోసం వెతకండి. Source*గా, destination*లేదా*:*గా ఉన్న rule allow-all: ప్రతి device ప్రతి ఇతర device ని ప్రతి port మీద చేరుకోవచ్చు. దాన్ని మార్చే steps కింద ఉన్నాయి.
Allow-all ని మార్చడం, step by step
మొదలుపెట్టే ముందు: ఇది మీ policy ని మారుస్తుంది, devices ని ఒకదాని నుంచి ఒకటి కట్ చేయవచ్చు. ఆ తర్వాత ప్రతి service ని test చేయగలిగినప్పుడు చేయండి. 15 నుంచి 30 నిమిషాలు పడుతుంది. Undo చేయడానికి, policy యొక్క saved copy ని తిరిగి paste చేసి (“మీరు Tailscale SSH వాడకపోతే: అన్ని చోట్లా off చేయండి” లోని 1వ step) save చేయండి, లేదా Configuration logs page నుంచి ఆ మార్పును revert చేయండి. మీ phone లేదా laptop exit node ని వాడితే, ప్రతి save తర్వాత దాని internet access ని test చేయండి: exit-node grant తప్పుగా ఉంటే అది తెగిపోతుంది.
- మీ devices కి ఒకదాని నుంచి ఒకటి ఏం కావాలో రాసుకోండి: file shares, media server, subnet route, printer. కాగితం లేదా text file వాడండి.
- పైన చెప్పినట్లు policy కాపీ save చేయండి.
- ప్రతి అవసరానికి ఒక grant ని
"grants"section లో చేర్చండి (section లేకపోతే చేర్చండి; allow-all"acls"లో ఉంది), పైన “ఒక ఉదాహరణ policy” లోని NAS ఉదాహరణ లాగా. ఆ పేరును మీరు నిర్వచించకపోతేnasబదులు NAS యొక్క Tailscale address (Machines page లో కనిపిస్తుంది) ని వాడండి. Exit nodes వాడితే వాటికి ఒక grant చేర్చండి. - అదే ఉదాహరణలో లాగా, పని చేయాల్సిన వాటికి tests చేర్చండి. Save ని click చేయండి. ఏదైనా test fail అయితే, Tailscale ఆ మార్పును తిరస్కరించి ఆ test పేరు చెబుతుంది.
- Allow-all rule ని delete చేయండి, కానీ
"acls"section ని"acls": []గా ఉంచండి: deny-all కోసం Tailscale documentation ఆ రూపాన్ని ఇస్తుంది, section ని వదిలేస్తే అది allow-all తో సమానమని చెబుతుంది. పని చేయకూడని వాటికి tests చేర్చండి (వాటిని అంగీకరించకూడని device మీద ports 22, 445, 3389 వంటివి), మళ్ళీ Save ని click చేయండి. Allow-all ఇంకా ఉన్నంత వరకు ఆ tests fail అవుతాయి, అందుకే వాటిని ఈ step లోనే చేర్చాలి. - ప్రతి service ని దాన్ని వాడే device నుంచి test చేయండి. ఏదైనా fail అయితే, దాని grant ని చేర్చండి, లేదా saved copy ని తిరిగి paste చేయండి.
స్థితి
Version 1.104.4 ని 27 అక్టోబర్ 2026 (UTC) రోజు చివర్లో tag చేశారు; Tailscale changelog దానికి 28 అక్టోబర్ తేదీ ఇచ్చింది. 2 నవంబర్ 2026 న విడుదలైన version 1.104.5, Tailscale SSH connection stalls ని, restart hangs ని fix చేస్తుంది, approval గడువు ముగిసినప్పుడు check-mode sessions disconnect కాకుండా ఆపుతుంది; ప్రస్తుత release కి update చేయండి. 10 నవంబర్ 2026 న bulletins page (TS-2026-014 నుంచి TS-2026-017 వరకు, 26 అక్టోబర్ తేదీతో) లో CVE numbers కనిపించలేదు.
ఇది ఎలా చేశాను
ఈ checking ని Anthropic యొక్క AI model అయిన Claude తో కలిసి చేశాను. Replacement policy ని, దాని tests ని, ఈ post ని అది draft చేసింది. నా మొదటి draft ని Claude review చేసినప్పుడు default rule ఇప్పటికే root ని అనుమతిస్తుందని చూపింది. ఆ తర్వాత Claude దాన్ని Tailscale documentation తో check చేసింది; open-source code లో default policy లేదు.
పదకోశం
- Tailscale: WireGuard మీద నిర్మించిన mesh VPN; sign-in, keys ని చూసుకునే hosted service తో.
- Tailnet: ఒక Tailscale account లోని devices సమూహం.
- Policy file: Tailnet యొక్క access rules, admin console లో edit చేస్తారు. Grants ఏ device ఏ device ని చేరుకోవచ్చో నిర్ణయిస్తాయి;
sshsection ఎవరు Tailscale SSH sessions తెరవవచ్చో నిర్ణయిస్తుంది; tests rules మారినప్పుడల్లా వాటిని check చేస్తాయి. - Allow-all: ప్రతి device ప్రతి ఇతర device ని ప్రతి port మీద చేరుకోనిచ్చే default
aclsrule. - Tag:
tag:serverవంటి label; ఇది device కి user గుర్తింపు బదులు దాని సొంత గుర్తింపు ఇస్తుంది; tagged devicesautogroup:selfకిందకు రావు. - autogroup:member / self / nonroot: Tailnet లోని ఏ user అయినా; user కి చెందిన devices (tagged వి కాదు); root తప్ప ఏ local account అయినా.
- Tailscale SSH: Tailscale service లో built-in గా ఉన్న SSH server; ఎవరు login కావచ్చో passwords లేదా keys బదులు policy file నుంచి నిర్ణయిస్తుంది.
- Check mode: Session మొదలవక ముందు user ని మళ్ళీ sign in చేయమని అడిగే
sshrule action; ఒక sign-in default గా 12 గంటలు ఉంటుంది. - Exit node: ఇతర devices తమ internet traffic ని పంపగలిగే tailnet లోని device.
- root: Linux, macOS లోని administrator account; machine మీద ఏదైనా చేయగలదు.
- Subnet route: దాని వెనుక ఉన్న మొత్తం local network ని tailnet చేరుకునేలా చేసే device.
- Unix socket: ఒకే machine లోని programs ఒకదానితో ఒకటి మాట్లాడుకోవడానికి వాడే file లాంటి endpoint, ఉదాహరణకు Docker యొక్క control socket.
- Port forwarding (SSH లో): ఒక socket కి connection వంటి మరో connection ని SSH session ద్వారా మోసుకెళ్ళడం.
- Tailnet Lock: కొత్త device చేరే ముందు నమ్మదగిన devices దానిపై sign చేయాలని కోరే Tailscale feature.
- Foothold: Attacker ఇప్పటికే అదుపులో ఉంచుకున్న device; తదుపరి attacks దాని నుంచి మొదలవుతాయి.
- headscale: Tailscale hosted control server కి open-source ప్రత్యామ్నాయం.
- CVE: ఒక నిర్దిష్ట vulnerability కి public identifier.
- sudo: Command ని administrator గా నడిపే command prefix; password అడగవచ్చు.
- ssh: మరో machine లోకి login చేయించే command.
మూలాలు
- Tailworm report, Cyberdione Labs (24 అక్టోబర్ 2026, Tailscale ఇచ్చే తేదీ; report లో “2026-10” మాత్రమే కనిపిస్తుంది): https://tailworm.com/
- Tailscale, “Tailscale SSH: Findings and fixes”, 28 అక్టోబర్ 2026: https://tailscale.com/blog/tailscale-ssh-findings-fixes
- Tailscale, “Tailscale SSH: Investigation”: https://tailscale.com/ssh-investigation-update
- Tailscale security bulletins, TS-2026-004, TS-2026-009, TS-2026-014 నుంచి TS-2026-017 వరకు (10 నవంబర్ 2026 న మళ్ళీ చదివాను): https://tailscale.com/security-bulletins
- The Hacker News, “Unpatched Tailscale SSH Flaws Could Let a Hacked Device Reach Root on Other Servers”, 25 అక్టోబర్ 2026: https://thehackernews.com/2026/10/unpatched-tailscale-ssh-flaws-could-let.html
- Tailscale docs, Tailscale SSH (check mode, disable చేయడం): https://tailscale.com/docs/features/tailscale-ssh
- Tailscale docs, default policy (“Allow all”): https://tailscale.com/docs/reference/examples/acls
- Tailscale docs, policy file syntax, tests: https://tailscale.com/docs/reference/syntax/policy-file
- Tailscale docs, grants syntax: https://tailscale.com/docs/reference/syntax/grants
- Tailscale docs, admin console లో devices ని filter చేయడం: https://tailscale.com/docs/features/access-control/device-management/how-to/filter
- Tailscale docs, device ని remove చేయడం: https://tailscale.com/docs/features/access-control/device-management/how-to/remove
- Tailscale docs, Tailscale ని update చేయడం: https://tailscale.com/docs/features/client/update
- Tailscale docs,
tailscaledservice: https://tailscale.com/docs/reference/tailscaled - Tailscale source code (SSH server, netstack, peer API,
tailscaled.service), v1.104.4 tag: https://github.com/tailscale/tailscale
Policy แบบ default ของ Tailscale อนุญาต root SSH. Tailworm ทำให้ผมต้องอ่านมัน
อ่าน 11 นาที
โค้ด คำสั่ง และศัพท์เทคนิคคงไว้เป็นภาษาอังกฤษ
คุณได้รับผลกระทบหรือไม่? ข้อค้นพบด้าน SSH ของ Tailworm มีผลเฉพาะกับอุปกรณ์ที่รัน Tailscale SSH และอุปกรณ์จะรัน server นี้ก็ต่อเมื่อมีคนเปิด ด้วย tailscale set --ssh หรือด้วยสวิตช์ในแอปที่ครอบมันไว้ Windows, iPhone, Android, แอป Mac และอุปกรณ์ Synology กับ QNAP รัน server นี้ไม่ได้ เอกสารของ Tailscale ระบุว่า server นี้มีให้บน Linux และบน macOS เฉพาะรุ่น command-line แบบ open-source ส่วน source code ยัง build ให้ FreeBSD และ OpenBSD ด้วย ซอฟต์แวร์ NAS และ router บางตัวมีสวิตช์สำหรับมัน: หน้า Machines ใน admin console แสดงว่าอุปกรณ์ไหนรายงานว่ารัน server นี้ (ข้อ 2 ของการตรวจ) เวอร์ชัน 1.104.4 หรือใหม่กว่าแก้ช่องโหว่ที่โพสต์ของ Tailscale เองอธิบายไว้ ข้อค้นพบ 11 ข้อของรายงานบางข้อเกี่ยวกับ headscale หรือโค้ดที่ยังไม่ได้เผยแพร่ ถ้าอุปกรณ์เครื่องใดรัน server นี้ ให้อัปเดตเครื่องนั้น
อีกเรื่องหนึ่ง: ถ้าคุณไม่เคยแก้ access controls ของ Tailscale เลย policy แบบ default ให้คุณเปิด session ของ Tailscale SSH ในฐานะ root (บัญชีผู้ดูแลระบบ) บนอุปกรณ์ของคุณเองเครื่องใดก็ได้ที่รัน server นี้ หลังจากล็อกอินซ้ำใน browser ใครก็ตามที่ยึดอุปกรณ์ของคุณเครื่องที่ไม่มี tag (tag คือป้ายชื่ออย่าง tag:server อุปกรณ์ที่บ้านส่วนใหญ่ไม่มี) อาจทำแบบเดียวกันได้ กฎ default ไม่ครอบคลุมอุปกรณ์ที่มี tag ถ้าไม่มีอุปกรณ์ใดรัน server นี้ กฎนั้นยังไม่มีเครื่องให้มีผลในตอนนี้ นี่เป็นงานดูแลความเรียบร้อย ไม่ใช่เหตุฉุกเฉิน การลบส่วน ssh ปิดช่องนี้ การตรวจ 5 นาที ด้านล่างแสดงวิธีทำตามลำดับที่ปลอดภัย
access policy ที่ Tailscale เขียนให้ตอนผมสร้าง tailnet (เครือข่าย Tailscale ของผม) อนุญาตให้เปิด SSH session แบบ root บนอุปกรณ์ของผมเอง ผมไม่เคยเปิดดูมันเลย Claude ซึ่งเป็นโมเดล AI ชี้เรื่องนี้ให้เห็นในการตรวจร่างแรกของผมสำหรับโพสต์นี้ ระหว่างที่เราตรวจเครือข่ายของผมเทียบกับ Tailworm
Tailworm คือรายงานที่เผยแพร่ช่วงสุดสัปดาห์ของวันที่ 24 ตุลาคม 2026 มีข้อค้นพบ 11 ข้อใน Tailscale และ headscale ข้อที่ร้ายแรงที่สุดอยู่ใน SSH server ที่ติดมากับ Tailscale ในแล็บของนักวิจัย ผู้โจมตีที่ควบคุมอุปกรณ์หนึ่งเครื่องได้สิทธิ์ root บนเครื่องอื่นที่รัน Tailscale SSH ภายใต้กฎที่อนุญาตให้อุปกรณ์นั้นเข้ามา ตอนที่รายงานออก Tailscale ยังไม่ได้ปล่อยการแก้ไข
ด้านล่างคือการตรวจ 5 นาทีสำหรับ tailnet ของคุณเอง ส่วนสิ่งที่การโจมตีต้องใช้ และสิ่งที่ผมพบ อยู่ถัดจากนั้น
เพิ่งเริ่มใช้ command line? วิธีอ่านกล่องคำสั่ง
PS> หมายถึง: พิมพ์ใน PowerShell บน Windows (เมนู Start → พิมพ์ powershell → Enter) $ หมายถึง: พิมพ์ใน terminal บน Linux หรือ Mac หรือบนเครื่องระยะไกลหลังจากที่คุณล็อกอินด้วย ssh (คำสั่งที่ใช้ล็อกอินเข้าเครื่องอื่น) อย่าพิมพ์ $ หรือ PS> เอง
แต่ละบรรทัดที่ขึ้นต้นด้วย $ หรือ PS> คือคำสั่งหนึ่งคำสั่ง คลิกที่ $ เพื่อคัดลอกเฉพาะบรรทัดนั้น วางลงไป กด Enter และรอให้ทำงานเสร็จก่อนจะไปคำสั่งถัดไป กล่องที่มีปุ่ม Copy อยู่ด้านบนเก็บคำสั่งเดียว (หรือไฟล์เดียว) จึงต้องคัดลอกทั้งกล่อง กล่องเส้นประแสดงสิ่งที่คุณควรเห็นตอบกลับมา คุณไม่ต้องพิมพ์มัน
ตรวจ tailnet ของคุณเองใน 5 นาที
ก่อนเริ่ม
- สิ่งที่ต้องมี: คอมพิวเตอร์ (ขั้นตอนเหล่านี้ทำบนโทรศัพท์ได้ยาก), browser และบัญชีที่ล็อกอินเข้า tailnet ของคุณได้ด้วย role Owner หรือ Admin (role Network admin ลบอุปกรณ์ไม่ได้ role IT admin แก้ policy ไม่ได้)
- ใช้เวลาเท่าไร และย้อนกลับอย่างไร: ประมาณ 5 นาทีสำหรับส่วน “ดู” ซึ่งไม่เปลี่ยนอะไร ทุกการเปลี่ยน policy เริ่มด้วยการเก็บสำเนา และทุกกล่องบอกว่าแค่ดูหรือเปลี่ยนอะไร
ดู: ไม่มีอะไรเปลี่ยน
- เปิด admin console เปิด web browser ไปที่
console.tailscale.com/admin/machinesและล็อกอินด้วยบัญชีที่เป็นเจ้าของ tailnet ของคุณ ขั้นนี้แค่เปิดหน้าเว็บ ใช้เวลาประมาณ 1 นาที คุณควรเห็นตารางอุปกรณ์ของคุณ ถ้าเปิดหน้านี้ไม่ได้ บัญชีของคุณอาจไม่มี role Owner หรือ Admin ให้ถามคนที่มี - หาอุปกรณ์ที่รัน Tailscale SSH เหนือตาราง คลิก Filters เลือก Property แล้วเลือก Tailscale SSH ตารางจะเหลือเฉพาะอุปกรณ์ที่รายงานว่ารัน server นี้ ตารางว่างหมายความว่าไม่มีเครื่องไหนรัน ถ้าหา Filters ไม่เจอ ดู หน้าว่าด้วยการกรองอุปกรณ์ ของ Tailscale
- ไม่บังคับ: ยืนยันบนอุปกรณ์หนึ่งเครื่อง กล่องที่พับอยู่ใต้รายการนี้แสดงวิธี บน Linux หรือบน Mac ที่ใช้ รุ่น command-line
- อ่าน policy ของคุณ ในเมนูด้านบนของ console คลิก Access controls ถ้าเปิดเป็น visual editor ให้สลับไปที่ JSON editor คลิกในข้อความ กด Ctrl+F (Cmd+F บน Mac) พิมพ์
"ssh"แล้วกด Enter ถ้าไม่พบ แสดงว่า policy ไม่มีกฎ SSH และคุณข้ามไปที่ “สำหรับทุกคน” ด้านล่างได้ ถ้าพบส่วนที่หน้าตาเหมือนกฎที่แสดงไว้ใต้หัวข้อ “Policy ที่ผมไม่เคยเขียน” ด้านล่าง แสดงว่า policy ของคุณอนุญาต root session บนอุปกรณ์ของคุณเอง ถ้าหน้าตาต่างไป ให้อ่านบรรทัด"users"ของมัน: ถ้ามีrootอยู่ในนั้น แสดงว่าอนุญาต root session ถ้าข้อ 2 แสดงอุปกรณ์ ให้ไปที่ “ถ้าคุณใช้ Tailscale SSH” ด้านล่าง ถ้าตารางของข้อ 2 ว่าง ให้ไปที่ “ถ้าคุณไม่ใช้ Tailscale SSH”
ไม่บังคับ: ยืนยันบนอุปกรณ์หนึ่งเครื่อง (Linux หรือ Mac ที่ใช้รุ่น command-line)
เปิด terminal: บน Mac กด Cmd+Space พิมพ์ terminal แล้วกด Enter บน Linux เปิดแอป terminal หรือล็อกอินเข้าเครื่องระยะไกลด้วย ssh <your-user>@<device-address> (ssh ใช้ได้ใน PowerShell บน Windows ด้วย) จากนั้นรันคำสั่งด้านล่าง grep -i runssh เก็บไว้เฉพาะบรรทัดที่มีคำว่า RunSSH
tailscale debug prefs | grep -i runsshตอบกลับทันที
"RunSSH": false,true หมายความว่าอุปกรณ์รัน server นี้ ถ้าไม่มีอะไรแสดงออกมา หรือ shell ขึ้นว่า tailscale: command not found ให้ใช้ผลจากข้อ 2 แทน เพราะแอป Mac และ Windows รัน server นี้ไม่ได้
สิ่งที่ Tailworm ต้องใช้
ผมไล่รายการสิ่งที่การโจมตีนี้ต้องใช้ และตรวจทีละข้อเทียบกับระบบของผมเอง
อุปกรณ์ในบัญชี Tailscale เดียวกันรวมกันเป็น tailnet และ policy file ใน admin console เป็นตัวกำหนดว่าอุปกรณ์ไหนเข้าถึงอุปกรณ์ไหนได้
Tailscale SSH คือ SSH server ที่อยู่ภายใน service ของ Tailscale เริ่มทำงานบนอุปกรณ์ด้วย tailscale set --ssh ตัวที่กำหนดว่าใครล็อกอินได้ และในฐานะบัญชีไหนในเครื่อง คือ policy file ไม่ใช่รหัสผ่านหรือ key ตามรายงาน เมื่อ session แบบนี้ทำ forwarding ของ Unix socket (จุดเชื่อมต่อที่มีลักษณะคล้ายไฟล์ ซึ่งโปรแกรมบนเครื่องเดียวกันใช้คุยกัน) service ของ Tailscale ทำงานนั้นด้วยสิทธิ์ของ root และช่องว่างระหว่างการตรวจกับการใช้ socket ทำให้ผ่านการตรวจที่มีไว้จำกัดมันไปได้ session ที่ได้รับอนุญาตให้เข้ามาในฐานะ user ธรรมดาจึงทำงานในฐานะ root ได้
การโจมตีผ่าน SSH ต้องมีสามอย่าง:
- อุปกรณ์เป้าหมายที่รัน Tailscale SSH
- กฎใน policy file ที่ให้อุปกรณ์ของผู้โจมตีเปิด SSH session บนเป้าหมายนั้นได้ โดยอนุญาต forwarding ด้วย
- ผู้โจมตีที่ควบคุมอุปกรณ์ที่กฎนั้นครอบคลุมอยู่แล้ว
Tailworm ไม่ได้ให้ข้อที่สาม ผู้โจมตีต้องหามาเอง: web application ที่มีช่องโหว่, package ที่เป็นอันตราย, phishing, รหัสผ่านที่ถูกขโมย นี่ไม่ใช่การโจมตีที่มาจาก internet สาธารณะ
สิ่งที่ผมพบ
| สิ่งที่การโจมตีต้องใช้ | สิ่งที่ผมพบ | ตรวจที่ไหนบนระบบของคุณ |
|---|---|---|
| Tailscale SSH รันอยู่บนเป้าหมาย | ตอนที่ผมตรวจ ไม่ได้รันบนอุปกรณ์เครื่องใดของผมเลย | หน้า Machines ใน admin console กรองด้วย property “Tailscale SSH” (ข้อ 2 ของการตรวจ) |
| กฎใน policy ที่อนุญาต SSH session | มี: กฎ default ซึ่งให้เข้าได้ทั้งแบบ root และบัญชีธรรมดา บนอุปกรณ์ของผมเอง หลังล็อกอินซ้ำ | policy file (ข้อ 4 ของการตรวจ) |
| foothold บนอุปกรณ์ที่กฎครอบคลุม | เป็นไปได้ เหมือนเครือข่ายทั่วไป | — |
| ข้อค้นพบอื่น ๆ | ใช้กับฟีเจอร์ที่เกี่ยวข้อง: app connector, tailscale serve, การเชื่อมต่อ relay ที่ client ทุกตัวทำ และ headscale (ตัวแทนแบบ open-source ของ control server แบบ hosted ของ Tailscale) |
admin console |
ดังนั้น สิ่งแรกที่การโจมตีต้องใช้จึงไม่มีอยู่ ส่วนสิ่งที่สอง คือกฎที่อนุญาต session มีอยู่แล้วโดย default เอกสารของ Tailscale ไม่ได้บอกว่ากฎ default อนุญาต forwarding หรือไม่ ซึ่งเป็นสิ่งที่การโจมตีผ่าน socket ต้องใช้
เจาะลึก: วิธีตรวจแต่ละข้อแบบอื่น
- ถ้าคุณใช้ OPNsense plugin Tailscale เก็บค่าตั้งไว้หลัง API การเรียกแบบอ่านอย่างเดียว
GET /api/tailscale/settings/getคืนค่า"enableSSH":"0"เมื่อ SSH server ปิดอยู่ เอกสารของ Tailscale ระบุ SSH server เฉพาะ Linux และ macOS แต่ source code ของ Tailscale build server นี้สำหรับ FreeBSD และ OpenBSD ด้วย และ plugin ของ OPNsense มีสวิตช์สำหรับมัน - ทุกอุปกรณ์ ใน admin console: Machines → Filters → Property → Tailscale SSH ถ้าไม่มีอุปกรณ์ใดตรงเงื่อนไข แสดงว่าไม่มีเครื่องไหนรายงานว่ารัน server นี้
- อุปกรณ์ Linux ตรวจจากภายในเครื่อง สวิตช์
--sshตั้งค่า preference ชื่อRunSSHคำสั่งtailscale debug prefs | grep -i runsshแสดง"RunSSH": falseเมื่อ server ปิดอยู่ ส่วนtailscale set --ssh=falseใช้ปิดมัน - เวอร์ชัน รายงานทดสอบ 1.104.2 และไม่ได้พูดถึงเวอร์ชันก่อนหน้า การแก้ไขของ Tailscale อยู่ใน 1.104.4
เจาะลึก: รายงานพบอะไร และ Tailscale ว่าอย่างไร
- สิ่งที่ทดสอบ Tailscale 1.104.2 และ headscale 0.29.5 (ตัวแทนแบบ open-source ของ control server แบบ hosted ของ Tailscale) โดยไม่ได้ดัดแปลง ในแล็บ ระหว่างวันที่ 22 ถึง 24 ตุลาคม 2026
- ข้อค้นพบที่ 1 ถึง 3: SSH socket forwarding การ forwarding ของ Unix socket ทั้งแบบ local และ remote (
ssh -Lและssh -R) ทำโดย service ของ Tailscale ที่รันด้วยสิทธิ์ root การตรวจ path ทำในจังหวะหนึ่ง แต่ใช้ socket ในอีกจังหวะหนึ่ง และ loop ที่วนเร็วภายใน session แย่งใช้ช่องว่างนั้นได้ก่อน (race) ในแล็บ วิธีนี้ได้ root ผ่าน Docker socket, แทนที่ socket ที่ root เป็นเจ้าของด้วย socket ของผู้โจมตีเอง และดักจับ key ที่ใช้ลงทะเบียนอุปกรณ์ใหม่ ซึ่งหลังจากนั้นพาเครื่องของผู้โจมตีเข้าร่วมเครือข่าย รายงานแสดงขั้นสุดท้ายนี้ตั้งแต่ต้นจนจบเฉพาะเมื่อ Tailnet Lock ปิดอยู่ เมื่อ Tailnet Lock เปิดอยู่ รายงานดักจับข้อมูลที่ต้องใช้เพื่อปิด lock ได้ แต่ไม่ได้นำไปใช้ - ข้อค้นพบที่ 5: SSH ทำให้หน่วยความจำหมด session ที่ล็อกอินแล้วทำให้ service ของ Tailscale ที่รันด้วยสิทธิ์ root จองหน่วยความจำเพิ่มไปเรื่อย ๆ ได้
- สิ่งที่ Tailscale บอก Tailscale บอกว่าปัญหาเหล่านี้ “require urgent attention” (ต้องได้รับความสนใจโดยเร่งด่วน) และช่องโหว่ SSH “primarily concerned how permissions were enforced” (เกี่ยวกับวิธีบังคับใช้สิทธิ์เป็นหลัก) หลังจากที่การเชื่อมต่อได้รับอนุญาตแล้ว Tailscale โต้แย้งว่าปัญหาเหล่านี้ถือเป็น worm ไม่ได้ และเรียกสิ่งนี้ว่าการเคลื่อนที่ไปยังเครื่องอื่น (lateral movement) ที่จำกัดอยู่แค่การเชื่อมต่อที่ policy อนุญาตอยู่แล้ว
- Wormability ในแล็บ อุปกรณ์ที่ถูกเจาะหนึ่งเครื่องเข้าถึงทุกอุปกรณ์ที่ policy อนุญาต ใช้เวลาไม่ถึงหนึ่งวินาทีต่อขั้น รายงานระบุมาตรการหนึ่งที่หยุดการแพร่ได้ คือกฎที่เขียนแบบต้นทางหนึ่งไปปลายทางหนึ่ง key ที่เก็บในฮาร์ดแวร์ (TPM หรือ Secure Enclave) ป้องกันไม่ให้ตัวตนของอุปกรณ์ที่ถูกขโมยใช้ได้ต่อไป
- ข้อค้นพบอื่น ๆ บางข้อ การออกแบบ app connector ที่ไม่ตรวจว่า traffic กำลังไปที่ไหน (Tailscale บอกว่าเวอร์ชันนี้ คือ Conn25 ยังไม่ได้เผยแพร่);
tailscale serveที่ forward ไปยัง control socket ของ service เอง; หน่วยความจำหมดใน relay client (ผมไม่พบ bulletin สำหรับข้อนี้); และ denial of service ต่อ headscale - Bulletin Tailscale เผยแพร่สี่ฉบับ ลงวันที่ 26 ตุลาคม ทั้งหมดแก้แล้วใน 1.104.4: TS-2026-014 (SSH socket forwarding ตอนนี้ Tailscale ทำ forwarding ในฐานะ user ที่ล็อกอิน ไม่ใช่ในฐานะ root), TS-2026-015 (SSH ทำให้หน่วยความจำหมด), TS-2026-016 (
tailscale serveเข้าถึง socket ที่มีสิทธิ์สูง) และ TS-2026-017 (Serve ผ่าน HTTP/2 อาจส่งค่าTailscale-App-Capabilitiesของ mount หนึ่งไปให้อีก mount หนึ่งบน node เดียวกัน) ระหว่างที่อุปกรณ์ยังไม่ได้อัปเดต มาตรการบรรเทาของ Tailscale สำหรับช่องโหว่ด้าน forwarding คือTS_SSH_DISABLE_FORWARDING=1ใน environment ของ service Tailscale ส่วนมาตรการชั่วคราวใต้หัวข้อ “จากนั้นเปลี่ยนสิ่งที่คุณพบ” ด้านล่างแสดงวิธีทำ - การแก้ไขก่อนหน้านี้ในส่วนเดียวกัน bulletin ของเดือนมิถุนายนและกรกฎาคมครอบคลุมเรื่อง SSH socket forwarding ที่ไม่เคารพสิทธิ์ของ symlink (TS-2026-004, 3 มิถุนายน) และวิธีเลี่ยง
autogroup:nonroot(TS-2026-009, 13 กรกฎาคม) ไว้แล้ว ทั้งสองข้อแก้แล้วใน 1.98.9 - Forwarding กับกฎ default SSH server ของ Tailscale จะทำ forwarding เฉพาะเมื่อกฎที่ตรงกันมีสิทธิ์ forwarding ที่ได้มาจาก coordination server ของ Tailscale (
allowLocalPortForwardingและallowRemotePortForwardingใน source code) เอกสารสาธารณะของ Tailscale ไม่ได้บอกว่า policy ให้สิทธิ์นี้อย่างไร หรือกฎ default ให้สิทธิ์นี้หรือไม่ รายงานบอกให้ตั้ง field ของ forwarding รายกฎเป็น false บน hosted service ของ Tailscale แต่ไม่ได้ระบุชื่อ field เหล่านั้น ผมหา field เหล่านั้นในเอกสาร policy ของ Tailscale ไม่พบ Bulletin TS-2026-014 ระบุว่าปัญหานี้กระทบผู้ใช้ที่ “allow local or remote forwarding in their access policies” (อนุญาต local หรือ remote forwarding ใน access policy ของตน) - การเปิดเผยข้อมูล Tailscale บอกว่าได้รับรายงานในเช้าวันเสาร์ที่ 24 ตุลาคม และรายงานถูกเผยแพร่สองชั่วโมงหลังจากนั้น ขณะนั้น Tailscale กำลังสืบสวนปัญหาที่เกี่ยวข้องอยู่แล้ว The Hacker News รายงานว่านักวิจัยอธิบายเรื่องนี้ว่า “reported but not coordinated” (แจ้งแล้วแต่ไม่ได้ประสานงาน)
Policy ที่ผมไม่เคยเขียน
เมื่อคุณสร้าง tailnet Tailscale จะให้ policy แบบ default มาด้วย เอกสารของ Tailscale อธิบายไว้ว่า ทุกอุปกรณ์เข้าถึงอุปกรณ์อื่นได้ทุกเครื่องทุก port (ข้างล่างผมเรียกส่วนนี้ว่า allow-all) และผู้ใช้ทุกคนเปิด session ของ Tailscale SSH บนอุปกรณ์ของตัวเองได้ใน check mode ในฐานะ root หรือ user ธรรมดา ส่วน SSH มีหน้าตาแบบนี้:
"ssh": [
  {
    "action": "check",
    "src":    ["autogroup:member"],
    "dst":    ["autogroup:self"],
    "users":  ["autogroup:nonroot", "root"]
  }
]
ผู้ใช้คนใดก็ตามของ tailnet (autogroup:member) เชื่อมต่อกับอุปกรณ์ที่ผู้ใช้คนนั้นเป็นเจ้าของ (autogroup:self ไม่รวมอุปกรณ์ที่มี tag) ได้ในฐานะบัญชีในเครื่องบัญชีใดก็ได้ ยกเว้น root (autogroup:nonroot) หรือในฐานะ root ก็ได้ ของผมมีกฎนี้ และมี allow-all ร่วมด้วย หน้า policy file ของ Tailscale อธิบายกฎ ssh แบบ default ด้วย autogroup:nonroot และไม่ได้พูดถึง root ส่วนหน้า SSH และ policy ตัวอย่างของ Tailscale มี root ดังที่แสดงไว้ข้างบน
กฎนี้แยกผมออกจากคนที่ยึดอุปกรณ์เครื่องหนึ่งของผมไม่ได้ สำหรับ Tailscale การเชื่อมต่อจากอุปกรณ์ของผมเครื่องใดก็คือผม ถ้าอุปกรณ์ Linux เครื่องหนึ่งใน tailnet รัน tailscale set --ssh คนที่ยึดอุปกรณ์อีกเครื่องของผมได้ก็เปิด root session บนเครื่องนั้นได้ นั่นคือกฎที่ทำงานตามการออกแบบ ไม่ใช่ช่องโหว่ Check mode ขอให้ผมล็อกอินใน browser และการอนุมัติหนึ่งครั้งอาจมีผลอยู่ 12 ชั่วโมง (ดูข้างล่าง)
Check mode ขอให้ล็อกอินใหม่ใน browser ก่อนที่ session จะเริ่ม ด้วย check period แบบ default เอกสารของ Tailscale ระบุว่าการล็อกอินใน check mode หนึ่งครั้งทำให้คุณเข้าเครื่องนั้นและอุปกรณ์เครื่องอื่นใน tailnet ได้เป็นเวลา 12 ชั่วโมงโดยไม่ต้องล็อกอินอีก เอกสารไม่ได้บอกว่าครอบคลุม session ที่เปิดจากอุปกรณ์อีกเครื่องด้วยหรือไม่ รายงานอธิบายว่าผู้โจมตีที่อยู่บนอุปกรณ์เครื่องหนึ่งรอให้คุณอนุมัติครั้งถัดไป หรือกระตุ้นให้คุณอนุมัติได้ ดังนั้น check mode ทำให้ช้าลงแต่ไม่ได้หยุดการโจมตี
Tailworm ต้องอาศัย socket forwarding เพื่อเปลี่ยนบัญชีธรรมดาให้เป็น root กฎ default ไม่ต้องใช้ socket forwarding เลย ใช้เพียงการอนุมัติใน check mode นี่เป็นพฤติกรรมที่เอกสารระบุไว้ ไม่ใช่ช่องโหว่ การอัปเดตเป็น 1.104.4 ก็ไม่ได้เปลี่ยนเรื่องนี้ session ที่ได้รับอนุญาตให้เข้ามาในฐานะ root ก็คือ root ตามการออกแบบ
สิ่งที่ผมเปลี่ยน
Policy ฉบับใหม่ไม่มีส่วน ssh เอกสารของ Tailscale ระบุว่าการลบกฎ SSH ทำให้ Tailscale SSH ถูกปิดทั้ง tailnet grant ใช้แทนที่ allow-all ได้ โดยให้เฉพาะสิ่งที่จำเป็น เช่น:
- Exit node ถ้าคุณใช้: สิทธิ์เข้าถึง
autogroup:internet - อุปกรณ์ไม่กี่เครื่องที่คุณต้องดูแล และไม่มีอะไรเกินนั้น ให้ grant นี้แคบไว้ อุปกรณ์ใดที่ grant ครอบคลุมจะยังเข้าถึงได้
การแทนที่ allow-all มีต้นทุน: สิ่งที่พึ่งพาการที่อุปกรณ์เข้าถึงกันได้จะหยุดทำงาน เช่น การแชร์ไฟล์, media server หรือ subnet route ให้ grant แยกของแต่ละอย่างก่อน
จากนั้นเป็น test policy file ใส่ test ได้ คือข้อความอย่างเช่น “ผู้ใช้คนนี้เข้าถึง port นี้ได้” ที่ Tailscale ตรวจทุกครั้งที่ไฟล์เปลี่ยน ถ้า test ข้อใดไม่ผ่าน Tailscale จะไม่รับการเปลี่ยนแปลงนั้น test ระบุได้ว่าอะไรต้องใช้ได้และอะไรต้องถูกปฏิเสธ เช่น SSH, การแชร์ไฟล์ และ remote desktop (port 22, 445 และ 3389) ถูกปฏิเสธบนอุปกรณ์ที่ไม่ต้องใช้
เจาะลึก: ตัวอย่าง policy
นี่เป็นเพียงรูปแบบ ไม่ใช่แม่แบบ มันตัดทุกอย่างยกเว้น exit node ถ้านำไปวางตามที่เป็นอยู่ มันจะตัดคุณออกจาก NAS หรือ media server ของคุณเอง address และอีเมลเป็นค่าตัวอย่างแทนของจริง
{
  "grants": [
    // 1. Use exit nodes.
    {"src": ["autogroup:member"], "dst": ["autogroup:internet"], "ip": ["*"]},

    // 2. Add a grant for each device you must reach, and no more.

    // Nothing else: other devices accept no inbound tailnet traffic.
  ],

  // An empty "acls" list: Tailscale's documentation gives this form for deny-all;
  // omitting the section is documented as allow-all.
  "acls": [],

  // No "ssh" section: no Tailscale SSH session is allowed anywhere.

  "tests": [
    {
      "src":    "you@example.com",
      // "accept": ["100.x.y.2:445"],  one line like this for each thing that must work.
      "deny":   ["100.x.y.3:22", "100.x.y.3:445", "100.x.y.3:3389"], // a device that must refuse these
    },
  ],
}
grant สำหรับ NAS ที่ควรให้บริการไฟล์แชร์แก่ผู้ใช้ของ tailnet ของคุณ และไม่ทำอย่างอื่น จะมีหน้าตาแบบนี้ (port เป็นตัวอย่าง และให้เพิ่มรายการ tcp: หนึ่งรายการสำหรับแต่ละบริการอื่นที่ NAS ต้องให้บริการ และ nas เป็นชื่อที่คุณกำหนดเองในส่วน hosts ของ policy เช่น "hosts": {"nas": "100.x.y.2"}):
{"src": ["autogroup:member"], "dst": ["nas"], "ip": ["tcp:445"]},หมายเหตุ:
- เฉพาะอุปกรณ์ที่มีสิทธิ์เข้าถึง
autogroup:internetเท่านั้นที่ใช้ exit node ได้ grant ข้อ 1 จึงเขียนแบบนั้น - test ตรวจกฎ ไม่ได้ตรวจเครือข่าย test ที่ผ่านไม่ได้พิสูจน์ว่าอุปกรณ์ตอบสนอง
- ทำไมต้องคง
"acls": []ไว้ เอกสารของ Tailscale ระบุว่าการไม่ใส่ส่วนaclsเทียบเท่ากับ policy allow-all แบบ default และตัวอย่าง deny-all ของเอกสารคือ"acls": []เอกสารไม่ได้บอกว่าการไม่ใส่หมายถึงอะไรใน policy ที่มี grant ให้คงรายการว่างไว้ แล้วให้ test เป็นตัวตัดสิน: test แบบ deny สำหรับ port ที่ allow-all จะเปิดให้ จะไม่ผ่านตราบที่ allow-all ยังมีผลอยู่ - เก็บสำเนา policy เดิมไว้ก่อนบันทึก (ข้อ 1 ของ “ถ้าคุณไม่ใช้ Tailscale SSH: ปิดให้หมดทุกเครื่อง” ด้านล่างทำสิ่งนี้) Tailscale ยังให้ย้อนการเปลี่ยนแปลงได้จากหน้า Configuration logs
เจาะลึก: วิธีที่ผมจะใช้อีก
ไล่รายการสิ่งที่การโจมตีต้องใช้ ตรวจทีละข้อบนอุปกรณ์ของคุณเองและจดวิธีตรวจไว้ มองหาสิ่งที่ผิดแม้ในจุดที่การโจมตีไม่ได้ใช้ แล้วแบ่งที่เหลือเป็นสิ่งที่ต้องเปลี่ยน สิ่งที่ต้องเฝ้าดู และความเสี่ยงที่จะยอมรับ
จากนั้นเปลี่ยนสิ่งที่คุณพบ
ถ้าคุณไม่ใช้ Tailscale SSH: ปิดให้หมดทุกเครื่อง
ก่อนเริ่ม: ขั้นตอนนี้เปลี่ยน policy ของคุณเพื่อไม่ให้อุปกรณ์ใดรับ Tailscale SSH session อย่าทำถ้า Tailscale SSH เป็นทางเดียวที่คุณเข้าเครื่องใดเครื่องหนึ่งได้ ใช้เวลาประมาณ 3 นาที ถ้าจะย้อนกลับ ให้วางสำเนาที่เก็บไว้กลับเข้าไป (ข้อ 1) แล้วบันทึก หรือย้อนการเปลี่ยนแปลงจากหน้า Configuration logs
- เก็บสำเนา policy ใน JSON editor คลิกในข้อความ แล้วกด Ctrl+A (Cmd+A บน Mac) จากนั้นกด Ctrl+C (Cmd+C) เปิด Notepad (เมนู Start → พิมพ์
notepad→ Enter) หรือ TextEdit บน Mac (เลือก Format → Make Plain Text ก่อน) วางด้วย Ctrl+V (Cmd+V) และบันทึกไฟล์เป็นpolicy-backup.jsonในโฟลเดอร์ Documents ไฟล์ควรมี policy ทั้งหมด โดยขึ้นต้นด้วย{ - ลบส่วน
sshกลับมาที่ console เลือกทุกอย่างตั้งแต่"ssh": [ลงไปถึง]ที่ตรงแนวกับมันด้านล่าง (ไม่ใช่]ที่อยู่ในกฎ) รวมถึง comma ที่ตามมาถ้ามี แล้วกด Delete policy file ยอมให้มี comma เกินได้ ส่วนอื่นให้คงไว้ตามเดิม - บันทึก คลิก Save Tailscale ตรวจ policy และ test ที่อยู่ในนั้นก่อนจะใช้การเปลี่ยนแปลง คุณควรเห็น console ยืนยันว่าบันทึกแล้ว ถ้ามีรายงาน syntax error แสดงว่ามี comma หรือวงเล็บอยู่ผิดที่ ให้วางสำเนาที่เก็บไว้กลับเข้าไป แล้วทำซ้ำตั้งแต่ข้อ 2 ถ้ามันระบุรายการ
sshTestsให้ลบ test นั้นด้วย - ตรวจ โหลดหน้าใหม่ กด Ctrl+F (Cmd+F) แล้วค้นหา
"ssh"ไม่ควรพบ อุปกรณ์ที่เคยเปิดใช้ไว้เองจะยังรัน server ต่อไปจนกว่าคุณจะรันtailscale set --ssh=falseบนเครื่องนั้น
ถ้าคุณใช้ Tailscale SSH: อัปเดต แล้วจำกัดกฎให้แคบลง
ก่อนเริ่ม: การอัปเดตทำให้ Tailscale SSH session ที่เปิดอยู่ทุกอันบนเครื่องนั้นสิ้นสุดลง อย่ารันการอัปเดตจาก Tailscale SSH session ให้เข้าเครื่องด้วยทางอื่น: ใช้คีย์บอร์ดและจอที่ตัวเครื่อง หรือล็อกอินด้วย ssh ธรรมดาใน local network ของคุณ การล็อกอินด้วย ssh ไปยัง address Tailscale ของอุปกรณ์ (100.…) ก็หลุดเช่นกันเมื่อ Tailscale restart และการหลุดกลางทางระหว่างอัปเดตอาจทำให้การติดตั้งสะดุด คำสั่งด้านล่างใช้กับ Debian, Ubuntu และ Raspberry Pi OS ที่ใช้ package repository ของ Tailscale เอง สำหรับระบบอื่น ดู หน้าว่าด้วยการอัปเดต ของ Tailscale
- ล็อกอินเข้าเครื่องด้วยทางอื่น แล้วเปิด terminal บนเครื่องนั้น คุณควรเห็น shell prompt ของเครื่อง
- ดูว่าเครื่องรันเวอร์ชันอะไร
tailscale versionบรรทัดแรกคือเลขเวอร์ชัน ถ้าเป็น 1.104.4 หรือใหม่กว่า แสดงว่ามีการแก้ไขแล้ว ถ้าต่ำกว่านั้นต้องอัปเดต
- อัปเดต
sudoรันคำสั่งในฐานะผู้ดูแลระบบ และอาจขอรหัสผ่านของคุณ ขณะพิมพ์จะไม่มีอะไรแสดงบนจอ ให้พิมพ์ให้ครบแล้วกด Enter
sudo apt update
sudo apt install --only-upgrade tailscale
แต่ละคำสั่งใช้เวลาไม่ถึงนาที Tailscale restart ไม่กี่วินาที ถ้าการอัปเดตหยุดกลางคัน คำสั่ง sudo dpkg --configure -a จะทำต่อให้เสร็จ ถ้า apt ขึ้นว่า tailscale เป็นเวอร์ชันล่าสุดอยู่แล้ว แสดงว่าอุปกรณ์มีการแก้ไขแล้ว หรือไม่ได้รับ Tailscale มาจาก repository ของ Tailscale
- ตรวจอีกครั้ง ด้วย
tailscale versionบรรทัดแรกควรเป็น 1.104.4 หรือใหม่กว่า - จำกัดกฎให้แคบลง ถ้าคุณล็อกอินเป็น root บน host บางเครื่อง เช่น Proxmox server หรือบน host ที่ไม่มีบัญชีอื่นใดใช้
sudoได้ การทำขั้นนี้จะตัดการเข้าถึงนั้น ให้ตรวจก่อน เก็บสำเนา policy (ข้อ 1 ของ “ถ้าคุณไม่ใช้ Tailscale SSH: ปิดให้หมดทุกเครื่อง”) ก่อนแก้ จากนั้นใน console ไปที่ Access controls, JSON editor หาบรรทัด"users"ของกฎsshและลบ, "root"ออกจากบรรทัดนั้น:
"users": ["autogroup:nonroot", "root"]"users": ["autogroup:nonroot"]คลิก Save กฎนี้จะไม่ให้ root session อีกต่อไป ให้ใช้ sudo หลังล็อกอิน บน host ที่บัญชีของคุณใช้ sudo ได้โดยไม่ต้องใส่รหัสผ่าน ขั้นนี้ทำให้ผู้บุกรุกช้าลงแต่หยุดไม่ได้ ขั้นนี้ไม่ได้ใช้แทนการอัปเดต: bulletin เดือนกรกฎาคม TS-2026-009 เป็นวิธีเลี่ยง autogroup:nonroot นอกจากนี้ให้จำกัด src และ dst เฉพาะคนและอุปกรณ์ที่ต้องใช้ SSH
มาตรการชั่วคราว: ปิด SSH forwarding บนอุปกรณ์ที่ยังอัปเดตไม่ได้
ใช้ขั้นตอนนี้เฉพาะเมื่อ package source ที่คุณใช้ยังไม่มี 1.104.4 หรือใหม่กว่า มาตรการบรรเทาของ Tailscale สำหรับช่องโหว่ด้าน forwarding คือการตั้งค่า TS_SSH_DISABLE_FORWARDING=1 ใน environment ของ service Tailscale บนการติดตั้งแบบ Debian service อ่านไฟล์ /etc/default/tailscaled (ไฟล์ tailscaled.service ใน source ของ Tailscale ระบุไฟล์นี้เป็น EnvironmentFile) ผมทดสอบคำสั่งด้านล่างกับสำเนาของไฟล์นั้น ไม่ได้ทดสอบกับ service Tailscale ที่กำลังรันอยู่ การ restart ทำให้ Tailscale SSH session ที่เปิดอยู่สิ้นสุดลง จึงให้รันคำสั่งเหล่านี้จากทางเข้าอื่น คำสั่งเหล่านี้ถือว่าระบบใช้ systemd
- สำรองไฟล์ ถ้าคำสั่งขึ้นว่า
No such file or directoryแสดงว่าอุปกรณ์นี้เก็บค่าตั้งไว้ที่อื่น ให้หยุดและอ่านหน้าของ Tailscale สำหรับการติดตั้งแบบของคุณ รันครั้งเดียวพอ: การรันครั้งที่สองจะเขียนทับไฟล์สำรองด้วยไฟล์ที่แก้แล้ว
sudo cp /etc/default/tailscaled /etc/default/tailscaled.bak- เพิ่มค่าตั้ง บรรทัดที่เพิ่มเริ่มด้วยบรรทัดว่าง เพื่อไม่ให้ไปต่อกับบรรทัดสุดท้ายของไฟล์
printf '\nTS_SSH_DISABLE_FORWARDING=1\n' | sudo tee -a /etc/default/tailscaledคำสั่งแสดงสิ่งที่เพิ่ม รันครั้งเดียวพอ: การรันครั้งที่สองจะทำให้ในไฟล์มีบรรทัดนี้สองบรรทัด
- Restart service
sudo systemctl restart tailscaled- ตรวจว่า service ที่กำลังรันได้ค่านี้
sudo cat /proc/$(systemctl show -p MainPID --value tailscaled)/environ | tr '\0' '\n' | grep TS_SSHTS_SSH_DISABLE_FORWARDING=1ถ้าไม่มี output แสดงว่า service ไม่ได้รับค่าตั้งนี้: ให้ตรวจว่าบรรทัดนี้อยู่ในไฟล์ด้วย grep TS_SSH /etc/default/tailscaled แล้วทำข้อ 3 ซ้ำ /proc/0/environ: No such file or directory หมายความว่า service ไม่ได้รันอยู่
- ถ้าจะย้อนกลับ ให้ลบบรรทัดนั้นออกและ restart ทำเช่นนี้ด้วยเมื่ออุปกรณ์รัน 1.104.4 หรือใหม่กว่าแล้ว เพราะค่าตั้งนี้เป็นมาตรการชั่วคราว การลบบรรทัดทำได้อย่างปลอดภัยแม้การอัปเดต package จะแทนที่ไฟล์ไปแล้วหลังข้อ 1 ไฟล์สำรองยังอยู่เป็นบันทึก การอัปเดตอาจถามว่าจะเก็บไฟล์ที่คุณแก้ไว้หรือไม่:
sudo sed -i '/^TS_SSH_DISABLE_FORWARDING=1$/d' /etc/default/tailscaled
sudo systemctl restart tailscaled
ถ้า sed ขึ้นว่าอ่านไฟล์ไม่ได้ แสดงว่าไม่มีอะไรให้ย้อนกลับบนอุปกรณ์นี้
สำหรับทุกคน
- ลบอุปกรณ์ที่คุณไม่ได้ดูแลแล้ว ก่อนที่อุปกรณ์นั้นจะหลุดจากมือคุณ อย่าลบอุปกรณ์ที่คุณเข้าถึงได้ทาง Tailscale เท่านั้น เพราะคุณต้องไปอยู่ที่เครื่องนั้นเพื่อเพิ่มกลับ ใน console เปิด Machines หาอุปกรณ์ตามชื่อในช่องค้นหา เปิดเมนูข้างอุปกรณ์ เลือก Remove แล้วเลือก Remove machine ในหน้าต่างยืนยัน อุปกรณ์จะหายไปจากรายการ ถ้าลบผิดเครื่อง ให้ล็อกอินอุปกรณ์นั้นอีกครั้งเพื่อเพิ่มกลับ ถ้า tailnet ของคุณกำหนดให้ต้องอนุมัติอุปกรณ์ ผู้ดูแล (admin) ต้องเป็นคนอนุมัติ
- ดู allow-all อีกครั้ง ค้นหา
"acls"และ"grants"ใน Access controls กฎที่ต้นทางเป็น*และปลายทางเป็น*หรือ*:*คือ allow-all: ทุกอุปกรณ์เข้าถึงอุปกรณ์อื่นได้ทุกเครื่องทุก port ขั้นตอนการแทนที่อยู่ถัดไป
แทนที่ allow-all ทีละขั้น
ก่อนเริ่ม: ขั้นตอนนี้เปลี่ยน policy ของคุณและอาจตัดอุปกรณ์ออกจากกัน ให้ทำเมื่อคุณทดสอบแต่ละ service ได้หลังจากนั้น ใช้เวลา 15 ถึง 30 นาที ถ้าจะย้อนกลับ ให้วางสำเนา policy ที่เก็บไว้กลับเข้าไป (ข้อ 1 ของ “ถ้าคุณไม่ใช้ Tailscale SSH: ปิดให้หมดทุกเครื่อง”) แล้วบันทึก หรือย้อนการเปลี่ยนแปลงจากหน้า Configuration logs ถ้าโทรศัพท์หรือแล็ปท็อปของคุณใช้ exit node ให้ทดสอบการใช้ internet ของเครื่องนั้นหลังบันทึกแต่ละครั้ง: grant ของ exit node ที่ผิดจะทำให้เครื่องนั้นใช้ internet ไม่ได้
- จดว่าอุปกรณ์ของคุณต้องใช้อะไรจากกัน: ไฟล์แชร์, media server, subnet route, เครื่องพิมพ์ ใช้กระดาษหรือไฟล์ข้อความ
- เก็บสำเนา policy ตามที่อธิบายไว้ข้างบน
- เพิ่ม grant หนึ่งรายการต่อความต้องการหนึ่งอย่าง ในส่วน
"grants"(ถ้ายังไม่มีส่วนนี้ให้เพิ่มเข้าไป กฎ allow-all อยู่ในส่วน"acls") เหมือนตัวอย่าง NAS ใน “ตัวอย่าง policy” ก่อนหน้านี้ ใช้ address Tailscale ของ NAS (หน้า Machines แสดงไว้) แทนnasถ้าคุณยังไม่ได้กำหนดชื่อนั้น เพิ่ม grant สำหรับ exit node ถ้าคุณใช้ - เพิ่ม test สำหรับสิ่งที่ต้องใช้ได้ ตามตัวอย่างเดียวกัน คลิก Save ถ้า test ไม่ผ่าน Tailscale จะไม่รับการเปลี่ยนแปลงและระบุชื่อ test นั้น
- ลบกฎ allow-all แต่คงส่วน
"acls"ไว้เป็น"acls": []เอกสารของ Tailscale ใช้รูปแบบนั้นสำหรับ deny-all และระบุว่าการไม่ใส่ส่วนนี้เทียบเท่า allow-all เพิ่ม test สำหรับสิ่งที่ต้องใช้ไม่ได้ (เช่น port 22, 445 และ 3389 บนอุปกรณ์ที่ไม่ควรรับ) แล้วคลิก Save อีกครั้ง test เหล่านั้นจะไม่ผ่านตราบที่ allow-all ยังอยู่ จึงเพิ่มในตอนนี้ - ทดสอบแต่ละ service จากอุปกรณ์ที่ใช้มัน ถ้าอันไหนไม่ทำงาน ให้เพิ่ม grant ของมัน หรือวางสำเนาที่เก็บไว้กลับเข้าไป
สถานะ
เวอร์ชัน 1.104.4 ถูก tag เมื่อช่วงดึกวันที่ 27 ตุลาคม 2026 (UTC) changelog ของ Tailscale ลงวันที่ 28 ตุลาคม เวอร์ชัน 1.104.5 ซึ่งออกเมื่อวันที่ 2 พฤศจิกายน 2026 แก้ปัญหา Tailscale SSH connection ค้าง และการค้างตอน restart และทำให้ session แบบ check-mode ไม่ถูกตัดการเชื่อมต่อเมื่อการอนุมัติหมดอายุ ให้อัปเดตเป็นรุ่นปัจจุบัน เมื่อวันที่ 10 พฤศจิกายน 2026 หน้า bulletin (TS-2026-014 ถึง TS-2026-017 ลงวันที่ 26 ตุลาคม) ไม่แสดงหมายเลข CVE
วิธีทำงานนี้
ผมตรวจด้วย Claude ซึ่งเป็นโมเดล AI ของ Anthropic Claude ร่าง policy ที่ใช้แทนและ test ของมัน รวมทั้งบทความนี้ การที่ Claude ตรวจร่างแรกของผมทำให้เห็นว่ากฎ default อนุญาต root อยู่แล้ว จากนั้น Claude ตรวจเรื่องนี้เทียบกับเอกสารของ Tailscale (open-source code ไม่มี policy แบบ default อยู่)
ศัพท์
- Tailscale: mesh VPN ที่สร้างบน WireGuard มี hosted service ที่จัดการการล็อกอินและ key
- Tailnet: กลุ่มอุปกรณ์ในบัญชี Tailscale เดียวกัน
- Policy file: กฎการเข้าถึงของ tailnet แก้ใน admin console Grants กำหนดว่าอุปกรณ์ไหนเข้าถึงอุปกรณ์ไหนได้ ส่วน
sshกำหนดว่าใครเปิด Tailscale SSH session ได้ tests ตรวจกฎทุกครั้งที่กฎเปลี่ยน - Allow-all: กฎ
aclsแบบ default ที่ให้ทุกอุปกรณ์เข้าถึงอุปกรณ์อื่นได้ทุกเครื่องทุก port - Tag: ป้ายชื่ออย่าง
tag:serverที่ให้อุปกรณ์มีตัวตนของตัวเองแทนที่จะเป็นตัวตนของผู้ใช้ อุปกรณ์ที่มี tag ไม่ถูกครอบคลุมโดยautogroup:self - autogroup:member / self / nonroot: ผู้ใช้คนใดก็ได้ของ tailnet; อุปกรณ์ที่ผู้ใช้เป็นเจ้าของ (ไม่รวมอุปกรณ์ที่มี tag); บัญชีในเครื่องบัญชีใดก็ได้ยกเว้น root
- Tailscale SSH: SSH server ที่ติดมากับ service ของ Tailscale ซึ่งตัดสินว่าใครล็อกอินได้จาก policy file แทนรหัสผ่านหรือ key
- Check mode: action ของกฎ
sshที่ให้ผู้ใช้ล็อกอินใหม่ก่อนที่ session จะเริ่ม การล็อกอินหนึ่งครั้งมีผล 12 ชั่วโมงโดย default - Exit node: อุปกรณ์ใน tailnet ที่อุปกรณ์อื่นส่ง traffic ออก internet ผ่านได้
- root: บัญชีผู้ดูแลระบบบน Linux และ macOS ซึ่งทำอะไรก็ได้บนเครื่อง
- Subnet route: อุปกรณ์ที่ให้ tailnet เข้าถึง local network ทั้งวงที่อยู่หลังมัน
- Unix socket: จุดเชื่อมต่อที่มีลักษณะคล้ายไฟล์ ซึ่งโปรแกรมบนเครื่องเดียวกันใช้คุยกัน เช่น control socket ของ Docker
- Port forwarding (ใน SSH): การส่งการเชื่อมต่ออื่น เช่นการเชื่อมต่อไปยัง socket ผ่าน SSH session
- Tailnet Lock: ฟีเจอร์ของ Tailscale ที่กำหนดให้อุปกรณ์ที่เชื่อถือได้ต้องเซ็นรับรองอุปกรณ์ใหม่ทุกเครื่องก่อนที่จะเข้าร่วมได้
- Foothold: อุปกรณ์ที่ผู้โจมตีควบคุมอยู่แล้ว และใช้เป็นจุดเริ่มโจมตีต่อ
- headscale: ตัวแทนแบบ open-source ของ control server แบบ hosted ของ Tailscale
- CVE: หมายเลขสาธารณะที่ระบุช่องโหว่เฉพาะรายการ
- sudo: คำนำหน้าคำสั่งที่รันคำสั่งในฐานะผู้ดูแลระบบ อาจขอรหัสผ่านของคุณ
- ssh: คำสั่งที่ใช้ล็อกอินเข้าเครื่องอื่น
แหล่งอ้างอิง
- รายงาน Tailworm, Cyberdione Labs (24 ตุลาคม 2026 ซึ่งเป็นวันที่ Tailscale ระบุ ตัวรายงานเองแสดงเพียง “2026-10”): https://tailworm.com/
- Tailscale, “Tailscale SSH: Findings and fixes”, 28 ตุลาคม 2026: https://tailscale.com/blog/tailscale-ssh-findings-fixes
- Tailscale, “Tailscale SSH: Investigation”: https://tailscale.com/ssh-investigation-update
- Tailscale security bulletins, TS-2026-004, TS-2026-009 และ TS-2026-014 ถึง TS-2026-017 (อ่านซ้ำเมื่อ 10 พฤศจิกายน 2026): https://tailscale.com/security-bulletins
- The Hacker News, “Unpatched Tailscale SSH Flaws Could Let a Hacked Device Reach Root on Other Servers”, 25 ตุลาคม 2026: https://thehackernews.com/2026/10/unpatched-tailscale-ssh-flaws-could-let.html
- เอกสาร Tailscale, Tailscale SSH (check mode, การปิด): https://tailscale.com/docs/features/tailscale-ssh
- เอกสาร Tailscale, policy แบบ default (“Allow all”): https://tailscale.com/docs/reference/examples/acls
- เอกสาร Tailscale, syntax ของ policy file และ test: https://tailscale.com/docs/reference/syntax/policy-file
- เอกสาร Tailscale, syntax ของ grants: https://tailscale.com/docs/reference/syntax/grants
- เอกสาร Tailscale, การกรองอุปกรณ์ใน admin console: https://tailscale.com/docs/features/access-control/device-management/how-to/filter
- เอกสาร Tailscale, การลบอุปกรณ์: https://tailscale.com/docs/features/access-control/device-management/how-to/remove
- เอกสาร Tailscale, การอัปเดต Tailscale: https://tailscale.com/docs/features/client/update
- เอกสาร Tailscale, service
tailscaled: https://tailscale.com/docs/reference/tailscaled - source code ของ Tailscale (SSH server, netstack, peer API,
tailscaled.service) และ tag v1.104.4: https://github.com/tailscale/tailscale
Leave a Reply